DOCUMENT 1
FOI 24/25-1942
Change the draft budget
SGP KP Publishing
Exported on 2025-05-11 22:56:09
Page 1 of 173
FOI 24/25-1942
SGP KP Publishing – Change the draft budget
Table of Contents
1 Recent updates . . . . . . . . . . . . . . . . . . . . . . . . . . . . . . . . . . . . . . . . . . . . . . . . . . . . . . . . . . 4
2 Before you start . . . . . . . . . . . . . . . . . . . . . . . . . . . . . . . . . . . . . . . . . . . . . . . . . . . . . . . . . . 5
3 Check for ART orders during a plan reassessment . . . . . . . . . . . . . . . . . . . . . . . . . . . . . 6
4 Understand when there's an active housing application . . . . . . . . . . . . . . . . . . . . . . . . . 8
5 Check the draft budget information is up to date . . . . . . . . . . . . . . . . . . . . . . . . . . . . . . . 9
6 Develop a draft budget from a $0 budget . . . . . . . . . . . . . . . . . . . . . . . . . . . . . . . . . . . . 10
7 Use the plan conversation support tool to develop the draft budget . . . . . . . . . . . . . 11
8 Add a support category . . . . . . . . . . . . . . . . . . . . . . . . . . . . . . . . . . . . . . . . . . . . . . . . . . . 12
8.1 Select support items and check plan comments .............................................................. 13
8.2 Review and submit ........................................................................................................... 13
9 Update a support category . . . . . . . . . . . . . . . . . . . . . . . . . . . . . . . . . . . . . . . . . . . . . . . . 15
9.1 Select support items and check plan comments .............................................................. 16
9.2 Review and submit ........................................................................................................... 16
10
Remove a support category . . . . . . . . . . . . . . . . . . . . . . . . . . . . . . . . . . . . . . . . . . . . . 18
11
Add the plan conversation support tool to the case . . . . . . . . . . . . . . . . . . . . . . . . . 19
12
Next steps . . . . . . . . . . . . . . . . . . . . . . . . . . . . . . . . . . . . . . . . . . . . . . . . . . . . . . . . . . . . 20
Table of Contents – 2
Page 2 of 173
FOI 24/25-1942
SGP KP Publishing – Change the draft budget
This article provides guidance for a planner delegate, planner (non-partnered area) or review
officer to:
• check for ART orders during a plan reassessment
• understand when there's an active housing application
• check the draft budget information is up to date
• develop a draft budget from a $0 budget
• use the plan conversation support tool to develop the draft budget
• add a support category
• update a support category
• remove a support category
• add the plan conversation support tool to the case.
Recent updates – 3
Page 3 of 173
FOI 24/25-1942
SGP KP Publishing – Change the draft budget
1 Recent updates
6 November 2024
New section added to upload the Plan Conversation Support Tool (PCST) to the case after the
draft budget has been developed.
4 November 2024
Guidance updated to reflect legislation to start a new body called the Administrative Review
Tribunal (ART). The ART replaced the Administrative Appeals Tribunal (AAT) on Monday 14
October 2024. Updates include Administrative Appeals Tribunal (AAT) changed to
Administrative Review Tribunal (ART).
3 October 2024
Guidance updated to advise all plans must be 12 months or less until PACE is updated to
enable funding periods.
12 August 2024
Guidance updated to advise the Plan Conversation Support Tool (PCST) must be used for all
new plans and plan reassessments.
Recent updates – 4
Page 4 of 173
FOI 24/25-1942
SGP KP Publishing – Change the draft budget
2 Before you start
You have:
• understood the draft budget. Go to article Understand the draft budget
• understood the support categories included in the draft budget. Go to article Support
Categories
• used the Plan Conversation Support Tool to develop the draft budget. Go to article
Understand and update the plan conversation support tool.
Before you start – 5
Page 5 of 173
FOI 24/25-1942
SGP KP Publishing – Change the draft budget
3 Check for ART orders during a plan reassessment
If you're doing a plan reassessment, you should check for any current (in effect) or previous
Administrative Review Tribunal (ART) orders, decisions or notices. You'll also need to check if
there's an ART application in progress.
There'll be an alert on the Person Account when an ART application is in progress. AAT alerts
are closed once the matter is finalised, the decision or order has been received and a plan
implemented. If there isn't a current alert, you stil need to check for any previous ART orders
and decisions on the
Documents tab of the
Person Account.
To check for ART decisions, orders or notices:
1. In the
Person Account, select the
Documents tab.
2. To help locate an ART related document, you can select the
Category heading and
look for any documents with the
Authorisation category. You can also select the
Sub
Category heading and look for documents with the
Legal Orders sub category.
3. Once you've located the ART related document, select the document from the list.
4. Select
Download from the
Document Details pop-up.
5. A copy of the document wil be downloaded to your personal files to view.
When there's an ART order or decision recorded, you need to make sure the effect of the order
or decision is maintained when you develop and approve subsequent plans.
Note: If the order or decision is stil in effect you should not make any changes to the supports
in the plan that relate to the order or decision. The order or decision wil usually state the length
of time it applies for. The
Justification in the
Plan Approval case wil also reference that the
plan was completed as the outcome of the ART order or decision and the period of time it's in
effect for.
When you reassess the plan, think about ART orders or decisions as evidence when you make
the decision to approve the new plan. A support wil usually remain in the new plan if there's no
evidence to suggest changes are needed because of an ART order or decision.
You should check:
• if the decision or order has a specific time period the support wil be in place
• if the decision or order relates to a particular life stage or transition
• if there's evidence the participant's situation has changed and the intent of the support
no longer applies.
If you're changing or removing a support which is included in the plan because of an ART order,
you'll need to include the reasons for changing this support in your justification.
Once an order or decision is no longer in effect, you may build and approve a plan which varies
from ART orders or decisions when:
• there's been a change in the participant's circumstances which has a substantial impact
on the participant's disability support needs;
or
• the participant's goals and objectives have changed and the support in question would
no longer assist them in achieving those new goals and aspirations;
or
• the available evidence clearly demonstrates the support no longer meets the NDIS
funding criteria (external).
Check for ART orders during a plan reassessment – 6
Page 6 of 173
FOI 24/25-1942
SGP KP Publishing – Change the draft budget
If you're not sure what the ART order, decision or notice means, you should check with a senior
planner or team leader. If you need to, you can contact the ART Case Management Branch by
email at s22(1)(a)(ii) - irrelevant material and make a request for contact with the ART case
manager responsible for the ART matter, or their supervisor.
Check for ART orders during a plan reassessment – 7
Page 7 of 173
FOI 24/25-1942
SGP KP Publishing – Change the draft budget
4 Understand when there's an active housing
application
When there's an active
Housing Application case on a
Person Account, you'll need to check
with a senior planner or team leader whether you can proceed with the
Plan Approval case.
There wil be an
Alert on the
Person Account when a housing application is in progress. The
Plan Approval case wil also show a banner on the
Draft Budget tab.
The banner wil say
The participant has a home and living application in progress. Please
don't work on the plan approval case until the home and living application has been
completed.
Note: The banner wil only appear on the
Plan Approval case when the
Notify Planning
checkbox has been selected in the
Housing Application case.
The
Plan Approval case owner wil receive a notification in PACE when a housing application
is created or completed. If the housing application is completed, the notification wil tell you to
review the housing application decision before continuing.
If there's a risk to the participant or their support needs, you'll need to progress with the
Plan
Approval case. Please review the risk matrix to confirm if the plan approval meets the criteria to
progress. You'll need to talk to your senior planner or team leader for guidance on how to
proceed, this includes if you won't meet the Participant Service Guarantee (external) timeframes
for approving a plan.
Note: If you complete the
Plan Approval case in error, or it was agreed with your team leader
or senior planner you needed to, before the
Housing Application is finalised, you'll need to
create a
Plan Change case. You should create a plan change request for a CEO's own
initiative reassessment (s48) as soon as the plan is approved. Go to article Create a plan
reassessment (s48) request. You should explain this to the participant at the plan meeting.
Understand when there's an active housing application – 8
Page 8 of 173
FOI 24/25-1942
SGP KP Publishing – Change the draft budget
5 Check the draft budget information is up to date
Note: This section is only for SAP CRM plans that are transitioning to PACE.
For plans already in PACE or TSP generated budgets for new participants, go to section
Use
the plan conversation support tool to develop the draft budget in this article.
For draft budgets with a $0 TSP, go to section
Develop a draft budget from a $0 budget in
this article.
When a participant's plan transitions from SAP CRM to PACE, you'll need to check when this
budget information was last synced. This wil make sure that you have the most up-to-date draft
budget in PACE.
1. In a
Plan Approval case, select the
Draft Budget tab.
2. You'll need to check the date under
Last calculated date from SAP.
o If the date is older than
48 hours (2 days) from today's date, the data has not
been able to sync with the case. Go to step 3.
o If the date is within
48 hours (2 days) from today's date, you can continue to
develop the draft budget. Go to section
Add a support category in this article.
3. You'll need to check the participant's current plan in SAP CRM for any changes to their
budget that isn't reflected in PACE.
4. If you need to make changes to supports to reflect the current SAP CRM budget, go to
the section
Update a support category in this article.
Check the draft budget information is up to date – 9
Page 9 of 173
FOI 24/25-1942
SGP KP Publishing – Change the draft budget
6 Develop a draft budget from a $0 budget
A $0 draft budget means no support categories have been generated. You'll need to manually
add funding to the budget.
There are different circumstances where a PACE first plan wil generate a $0 budget. To help
you understand the participant's support needs and what information needs to be captured in
PACE, go to article Action a plan approval case when access is granted without pre-access
information gathering.
Once you've gathered all the information you need, use the
Plan Conversation Support Tool
to help you to develop the draft budget. This tool helps make sure you've generated the right
budget, based on supports you're adding to the plan. You
must use the PCST for all new plans
and plan reassessments.
When you're ready to start developing the draft budget, go to section
Use the plan
conversation support tool to develop the draft budget in this article.
Develop a draft budget from a $0 budget – 10
Page 10 of 173
FOI 24/25-1942
SGP KP Publishing – Change the draft budget
7 Use the plan conversation support tool to develop
the draft budget
The Plan Conversation Support Tool (PCST) is mandatory for all new plans and plan
reassessments. If a participant or their authorised representative would like to know more
details about their total budget amount, they can ask for a copy of their NDIS budget breakdown
which is generated from the PCST.
The prices in the PCST are current and updated according to the NDIS Pricing and Price Limits.
Use the PCST to understand what to include in the draft budget
. Only include support in the
PCST after you make a decision to fund supports using:
• the Our Guideline – Reasonable and necessary supports (external)
• relevant Our Guidelines (external)
• article Support Categories.
For more information, go to article Understand and update the plan conversation support tool.
Use the plan conversation support tool to develop the draft budget – 11
Page 11 of 173
FOI 24/25-1942
SGP KP Publishing – Change the draft budget
8 Add a support category
You can add funding in a support category when:
• you have evidence the supports in that category meet the NDIS funding criteria
(external)
• you need to add an in-kind, direct commissioning or periodic support category back into
the budget after you removed it
• you're developing a draft budget where a TSP didn't generate.
To learn more about what you need to consider when funding support categories, go to article
Support Categories.
You'll need to have determined the amount of funded supports by using the PCST before
changing the draft budget. You
must use the PCST for all new plans and plan reassessments
and attach it to the participant record. Go to section
Use the plan conversation support tool
to develop the draft budget in this article.
You'll need to think about if you have enough information or evidence to make a reasonable and
necessary decision to add supports in the draft budget. If you don't have enough information,
you'll need to ask for further information from the participant (or their authorised representative).
Go to article Request for information for a plan approval case.
Note: If you're adding recurring transport to the draft budget, check if the participant has an
active bank account recorded. Where you're adding a bank account for the first time, you won't
be able to do this until after the plan has been approved.
Note: Check bank details are correct for participants who self-manage any part of their funding
or receive recurring payments. To do this, go to article View bank account details. If they have a
nominee or child representative with manage plan funding authority, make sure their bank
account details are up-to-date and assigned to the participant. To learn more, go to article
Before you update bank account details.
1. From the
Plan Approval case, select the
Draft Budget tab.
2. Select
New Support Category.
3. In the
Support Category field, enter the support category name.
4. Select the
Budget Type from the drop-down list. To learn more, go to article
Understand the draft budget.
5. Select the
Instalment Type.
6. If the
Instalment Type is:
o
Recurring, the
Amount wil be the
annual amount for this support.
o
Regular, the
Amount wil be the
monthly amount for this support.
o
Once-off, the
Amount wil be the
total amount for this support.
7.
Plan Duration field wil be locked. The default duration for new plans wil be 12 months
(1 year) and plan reassessments or variations wil be 36 months (3 years). Al plans
including new plans, scheduled and unscheduled reassessments
must be 12 months
(1 year) or less until PACE is updated to enable funding periods. To change the plan
duration, go to article Change plan duration.
Note: The funding period wil be applied to the Total Funding Amount of the
participant's plan and wil be the same length as the plan duration until PACE is
updated.
Add a support category – 12
Page 12 of 173
FOI 24/25-1942
SGP KP Publishing – Change the draft budget
8. Enter the
Amount for the support using the amount recommended by the Plan
Conversation Support Tool.
9. TSP generated budgets only: Select
TSP Variance Reason from the drop-down list.
10. If the support meets all of the NDIS funding criteria under the
Justifications heading,
select the checkbox to confirm this.
11. Record
Justification in the free text field. For some supports, this might automatically
populate. You can edit the justification to make it specific to the participant's support
needs. For more information about recording justifications, go to article Add budget
justifications.
Note: This field has a limit of 3000 characters. Certain special characters in this field
may cause an error, this is generally caused when copying justifications from SAP CRM
into PACE. If you see the characters |% you'll need to change these before you can
select save.
12. If you're using evidence to support your justification, select the
Evidence Used
checkbox.
13. Select the
Evidence Type from the drop-down list:
o If you select
Document, go to step 14.
o If you select
Other, go to step 15.
14. Enter the
Evidence Link. To bring up a list of evidence that's linked to the case, press
the spacebar. Select the correct evidence document to link to the decision. You can
view linked evidence on the
Evidence tab of the
Plan Approval case. To learn more
about linking evidence, go to article Add and link evidence to a case.
15. Enter the
Evidence Explanation into the free text field.
16. If you need to add more evidence to support your justification, select the checkbox
Add
further evidence links and repeat from step 13.
17. Select
Next.
8.1 Select support items and check plan comments
Plan comments wil print on the participant's plan. You'll need to select which support items
you're funding under each support category.
1. Check the plan comments for each support item in the support category. Go to article
Understand and check plan comments.
Note: Support items can't be added when there's no funding in a support category.
Please add funding to the support category if you want to identify support items. If you
add a $0 support category for flexibility of Core supports, you don't have to add support
item. You'll receive an error message if you select
Yes to any support item.
2. Select
Next.
8.2 Review and submit
1. On the
Review and Submit screen, you'll be able to view the
Base Description and
the
Plan Comments for the support category.
2. The support category
Base Description and
Plan Comments wil print to the
participant's plan. The
Base Description can't be edited.
Note: If you've added a $0 support category, only the base description wil be
displayed. Continue from Step 3.
3. Review the support category plan comments.
Add a support category – 13
Page 13 of 173
FOI 24/25-1942
SGP KP Publishing – Change the draft budget
o Check that comments are objective, include facts based on evidence, and
avoid personal opinions or feelings.
o Keep the text short, simple and in plain conversational English.
o Check your spelling and grammar.
o Avoid jargon.
o Introduce all acronyms before using them. For example, 'Assistive Technology
(AT)'.
o Avoid the use of special characters, such as < > or % as this wil cause an error
or the comment to appear blank.
4. If you need to make changes to any of the plan comments, select
Previous.
5. Once you've confirmed the base description and plan comments are correct, select the
checkbox to confirm this.
6. Select
Submit. If you need to add another support return to section
Add a support
category in this article.
Add a support category – 14
Page 14 of 173
FOI 24/25-1942
SGP KP Publishing – Change the draft budget
9 Update a support category
You can update a support category when you need to:
• change the way funding is made available
• change the budget type from flexible to stated
• decrease the budget if you have evidence the participant needs less support in their
new plan
• increase the budget, if you have evidence, because the participant's needs have
changed and they need more support to work towards their goals.
To al ow flexibility, you
can't remove
Core support categories. If the NDIS funding criteria isn't
met, update the
Amount to $0.00 for this support. This wil make sure that
Core supports can
continue to be flexible. To understand more about Core support categories, go to article
Understand the draft budget.
You'll need to have determined the amount of funded supports by using the Plan Conversation
Support Tool before changing the draft budget. You
must use the PCST for all new plans and
plan reassessments and attach to the participant record. Go to section
Use the plan
conversation support tool to develop the draft budget in this article.
1. From the
Plan Approval case, select the
Draft Budget tab.
2. Select the budget item from under either the
Flexible Budget or
Stated Budget
heading.
Note: If the support has been generated by a Typical Support Package (TSP), a
TSP
message wil appear under the
Support Category name.
3. Change the
Budget Type if needed. Think about the impact on plan flexibility for the
participant and their providers. Go to Support Categories for more information.
4. Select the
Instalment Type.
5. If the
Instalment Type is:
o
Recurring, the
Amount wil be the
annual amount for this support.
o
Regular, the
Amount wil be the
monthly amount for this support.
o
Once-off, the
Amount wil be the
total amount for this support.
6.
Plan Duration field wil be locked. The default duration for new plans wil be 12 months
(1 year) and plan reassessments or variations wil be 36 months (3 years). Al plans
including first plans, scheduled and unscheduled reassessments
must be 12 months (1
year) or less until PACE is updated to include funding periods. To change the plan
duration, go to article Change plan duration.
Note: The funding period wil be applied to the Total Funding Amount of the
participant's plan and wil be the same length as the plan duration until PACE is
updated.
7. Enter the
Amount for the support using the amount recommended by the Plan
Conversation Support Tool.
8. TSP generated budgets only: Select
TSP Variance Reason from the drop-down list.
9. If the support meets all of the NDIS funding criteria under the
Justifications heading,
select the checkbox to confirm this.
10. Record
Justification in the free text field. For some supports, this might automatically
populate. You can edit the justification to make it specific to the participant's support
needs. For more information about recording justifications, Go to article Add budget
justifications.
Note: This field has a limit of 3000 characters. Certain special characters in this field
may cause an error, this is generally caused when copying justifications from SAP CRM
Update a support category – 15
Page 15 of 173
FOI 24/25-1942
SGP KP Publishing – Change the draft budget
into PACE. If you see the characters |% you'll need to change these before you can
select save.
11. If you're using evidence to support your justification, select the
Evidence Used
checkbox.
12. Select the
Evidence Type from the drop-down list:
o If you select
Document, go to step 13.
o If you select
Other, go to step 14.
13. Enter the
Evidence Link. To bring up a list of evidence that's linked to the case, press
the spacebar. Select the correct evidence document to link to the decision. You can
view linked evidence on the
Evidence tab of the
Plan Approval case. To learn more
about linking evidence, go to article Add and link evidence to a case.
14. Enter the
Evidence Explanation into the free text field.
15. If you need to add more evidence to support your justification, select the checkbox
Add
further evidence links and repeat from step 12.
16. Select
Next.
9.1 Select support items and check plan comments
Plan comments wil print on the participant's plan. You'll need to select which support items
you're funding under each support category.
1. Check the plan comments for each support item in the support category. Go to article
Understand and check plan comments.
Note: Support items can't be added when there's no funding in a support category.
Please add funding to the support category if you want to identify support items. If you
add a $0 support category for flexibility of Core supports, you don't have to add support
item. You'll receive an error message if you select
Yes to any support item.
2. Select
Next.
9.2 Review and submit
1. On the
Review and Submit screen, you'll be able to view the
Base Description and
the
Plan Comments for the support category.
Note: The support category
Base Description and
Plan Comments will print to the
participant's plan. The
Base Description can't be edited.
Note: If you've added a $0 support category in Core, this wil be the only information
displayed. Continue from Step 3.
2. Review the support category plan comments. You'll need to make sure to:
o Check that comments are objective, include facts based on evidence, and
avoid personal opinions or feelings.
o Keep the text short, simple and in plain conversational English.
o Check your spelling and grammar.
o Avoid jargon.
o Introduce all acronyms before using them. For example, 'Assistive Technology
(AT)'.
o Avoid the use of special characters, such as < > or % as this wil cause an error
or the comment to appear blank.
3. If you need to make changes to any of the plan comments, select
Previous.
Update a support category – 16
Page 16 of 173
FOI 24/25-1942
SGP KP Publishing – Change the draft budget
4. Once you've confirmed the base description and plan comments are correct, select the
checkbox to confirm this.
5. Select
Submit. If you need to update another support, return to section
Update a
support category in this article.
Update a support category – 17
Page 17 of 173
FOI 24/25-1942
SGP KP Publishing – Change the draft budget
10 Remove a support category
You can remove a support category when the evidence shows the support:
• doesn't meet NDIS funding criteria (external)
• isn't required by the participant, this may include
Capital supports that were funded in
previous plans
• needs to be recorded as in-kind, direct commissioning or periodic support.
You won't be able to remove
Core flexible supports. If the NDIS funding criteria isn't met, record
$0.00 in the
Amount for this support. This wil make sure that
Core supports can continue to be
flexible.
If you've removed a support category to record it as in-kind, direct commissioning or periodic
support, go to article Add or remove in-kind supports.
To remove a support from the draft budget:
1. In a
Plan Approval case, select the
Draft Budget tab.
2. Select the support category from under either the
Flexible Budget or
Stated Budget
heading.
3. In the
Budget Item Update screen, scroll to the bottom and select
Remove Support
From Budget.
4. Select
Yes to confirm you want to remove the support category.
5. Select
Save.
6. Record your reason for removing the support category in the
Handover Notes tab. Go
to article Add handover notes for a plan approval case.
If you've decided not to fund a support the participant has asked for, you'll need to record a
declined support. Go to article Record a declined support.
Remove a support category – 18
Page 18 of 173
FOI 24/25-1942
SGP KP Publishing – Change the draft budget
11 Add the plan conversation support tool to the case
Once you've made changes to the draft budget in PACE and are ready to progress to the next
step, you must upload a copy of the plan conversation support tool (PCST). This wil act as a
record of how the draft budget was developed. Also, it can be used to generate a budget
breakdown if requested by a participant or authorised representative.
The PCST must be added as a complete excel workbook. Saving a single excel worksheet or
as a PDF wil not allow a budget breakdown to be produced if it's requested. Make sure you're
adding the complete PCST to the person account.
1. From the
Plan Approval case, select the
Documents tab.
2. Select
Add Documents. The
Documents Details pop-up window wil appear.
3. At
Please select a Document Category, select
Supporting Information.
4. At
Please select a Document SubCategory, select
General.
5. At
Does the document contain any Personal identifiable information (PI )?, select
No.
Note: Please make sure you're on the correct person account before adding a
document.
6. Provide any further information in the
Description free text field.
7. Select
Next.
8. Select
Upload Files.
9. Find and
Open the file to upload. Al documents in the table should be
Ready for
upload.
10. Select
Save. Al files should now show as
Uploaded successfully.
Note: If a document fails to upload, select
Retry.
11. Select
Close. The documents tab wil now show the document that was uploaded to the
case.
Note: When you've uploaded the document, confirmed it's in PACE and can be
opened, you must immediately delete al saved copies of the document to protect
participant privacy.
If you need to delete a document, go to article Delete a document from PACE.
Add the plan conversation support tool to the case – 19
Page 19 of 173
FOI 24/25-1942
SGP KP Publishing – Change the draft budget
12 Next steps
1. To progress towards a plan meeting, next you'll need to make a fund management
decision. Go to article Make fund management decision.
2. If you've changed the budget after the plan meeting and are ready to approve the plan,
go to article Approve and generate a plan.
Next steps – 20
Page 20 of 173
DOCUMENT 2
FOI 24/25-1942
Make a plan change decision
SGP KP Publishing
Exported on 2025-05-11 23:02:34
Page 21 of 173
FOI 24/25-1942
SGP KP Publishing – Make a plan change decision
Table of Contents
1 Recent updates . . . . . . . . . . . . . . . . . . . . . . . . . . . . . . . . . . . . . . . . . . . . . . . . . . . . . . . . . . 4
2 Before you start . . . . . . . . . . . . . . . . . . . . . . . . . . . . . . . . . . . . . . . . . . . . . . . . . . . . . . . . . . 5
3 Make a decision on a plan change request . . . . . . . . . . . . . . . . . . . . . . . . . . . . . . . . . . . . 6
4 Record an overal plan change decision . . . . . . . . . . . . . . . . . . . . . . . . . . . . . . . . . . . . . . 8
4.1 s47A variation decisions ..................................................................................................... 8
4.2 s48 reassessment decisions .............................................................................................. 9
5 Communicate your decision . . . . . . . . . . . . . . . . . . . . . . . . . . . . . . . . . . . . . . . . . . . . . . . 10
6 Add free text sub-justifications . . . . . . . . . . . . . . . . . . . . . . . . . . . . . . . . . . . . . . . . . . . . 11
6.1 Plan variation sub-justifications ........................................................................................ 11
6.1.1
Not to vary – add crisis or emergency funding in the plan ........................................................... 11
6.1.2
Not to vary – correct a minor or technical error in the plan .......................................................... 11
6.1.3
Not to vary – add supports to the plan ........................................................................................ 12
6.1.4
Not to vary – make minor changes to funding in the plan ........................................................... 12
6.1.5
Not to vary – make minor change to supports in the plan ........................................................... 12
6.1.6
Not to vary – change the plan reassessment date ...................................................................... 13
6.1.7
Not to vary – change the plan management type ........................................................................ 13
6.1.8
Vary – add crisis or emergency funding ...................................................................................... 14
6.1.9
Vary – change the plan management type .................................................................................. 14
6.1.10 Vary – correct a minor or technical error in the plan ................................................................... 14
6.1.11 Vary – make minor change to the funding in the plan ................................................................. 14
6.1.12 Vary – make minor change to the supports in the plan ............................................................... 14
6.1.13 Vary – change the plan reassessment date ................................................................................ 15
6.2 Plan reassessment justifications ...................................................................................... 15
6.2.1
Not to reassess – change in situation ......................................................................................... 15
6.2.2
Not to reassess – change to the funding in the plan ................................................................... 15
6.2.3
Not to reassess – change while the plan is suspended .............................................................. 15
6.2.4
Reassess – change in situation .................................................................................................. 15
6.2.5
Reassess – change to the funding in your plan .......................................................................... 15
7 Next steps . . . . . . . . . . . . . . . . . . . . . . . . . . . . . . . . . . . . . . . . . . . . . . . . . . . . . . . . . . . . . . 16
Table of Contents – 2
Page 22 of 173
FOI 24/25-1942
SGP KP Publishing – Make a plan change decision
This article provides guidance for a planner delegate or review officer to:
• make a decision on a plan change request
• record an overall plan change decision
• communicate your decision
• add free text sub-justifications.
Recent updates – 3
Page 23 of 173
FOI 24/25-1942
SGP KP Publishing – Make a plan change decision
1 Recent updates
3 April 2025
Updated guidance to include all sub-justifications for when the user needs to add extra sub-
justifications in the free text field.
10 March 2025
Updated guidance to:
• consider information recorded at the reassessment check-in parent case
• introduce the new plan continuation letter.
3 March 2025
Update to include free text justifications for new plan variation and plan reassessment rules.
Recent updates – 4
Page 24 of 173
FOI 24/25-1942
SGP KP Publishing – Make a plan change decision
2 Before you start
Note: if you have a plan change request over 21 days
do not use this article. Instead, go to
Progress a plan change (s47A and s48) request over 21 days.
You have:
• been allocated or assigned yourself a plan change case (received less than 21 days
ago)
• reviewed the plan change request. Go to article Assign and review a plan change case
• read and understood Our Guideline – Changing your plan (external).
Before you start – 5
Page 25 of 173
FOI 24/25-1942
SGP KP Publishing – Make a plan change decision
3 Make a decision on a plan change request
When making a plan change decision, you'll need to consider the following:
• the participant's situation, including any information or evidence provided
• the confidence level for the participant to continue using their plan, which can be found
under the Decisions tab
• the criteria that must be met to decide to vary a plan or complete a plan reassessment
• the type of plan change request. For example, if the plan change case is for a s47A,
then you'll need to decide either to vary or not vary. If you think the participant needs a
reassessment, then you'll need to make a decision not to vary for the s47A and make a
decision to do a 'CEO-initiated plan reassessment'
• the information recorded at the reassessment check-in, linked as a parent case to the
generated plan change case. For example, the recommendation from the reassessment
check-in to vary the participant's plan and continue the same NDIS supports. Learn
more about how to do this in section
If the plan change request is generated from a
reassessment check-in of article Assign and review a plan change case.
• if a variation to change the plan reassessment date wil result in the plan not being
reassessed for more than 5 years.
To learn more about changing a plan, go to Our Guidelines – Changing your plan (external).
Note: when a participant is eligible for specialist disability accommodation (SDA) but hasn't
located an enrolled dwelling or isn't ready to move in, a $1 amount is included in the SDA
support category as a placeholder. The plan comment is used to let the participant, or their
authorised representative know of the SDA decision. Once the participant finds an enrolled SDA
dwelling and confirms they can move in, we can consider a s47A to include the SDA funding. In
this situation this s47A can only be considered when the request is only for SDA funding.
You'll need to record your decision for each plan change request in the
Plan Change Case.
Depending on the legislative type selected, some plan change requests may be marked as
Not
Required. If the status of the plan change request is
Not Required, you don't need to do
anything.
1. In the
Plan Change case, select the
Decision tab.
2. Select the correct hyperlink within the
Plan Change Requests table.
3. At
Plan Change Request, select the
Decision tab.
4. Select a decision from the
What decision do you want to make? drop-down list.
Note: if any of the plan change requests are CEO-initiated, you won't be able to decline
the request.
5. Select a
Justification from the drop-down list.
6. Select the most suitable
Sub-justification from the drop-down list.
Note: If you decide to decline a plan change request or partially vary the plan, the
Sub-
justification you select wil be printed on the plan change decision letter.
Make a decision on a plan change request – 6
Page 26 of 173
FOI 24/25-1942
SGP KP Publishing – Make a plan change decision
If you:
o need to include additional sub-justifications, go to section
Add free text sub-
justifications in this article
o don't need to include additional sub-justifications, go to step 7.
7. Select
Save.
8. If needed, add any supporting evidence for the decision by selecting
New.
9. Select
Submit.
Make a decision on a plan change request – 7
Page 27 of 173
FOI 24/25-1942
SGP KP Publishing – Make a plan change decision
4 Record an overall plan change decision
4.1 s47A variation decisions
For s47A requests, you'll need to record an overall plan change decision. You'll need to do this
after you've recorded your decision on each plan change request in the case.
Note: your overall plan change decision needs to match the decision of each individual plan
change request.
1. In the
Plan Change case, select the
Decision tab.
2. Select
Overall Decision.
3. Select
Decision from the drop-down list.
4. Select
Justification from the drop-down list.
5. Enter
Justification Details into the text field.
6. If you need to add evidence to the decision, select
New and go to step 7. Otherwise, go
to step 11.
7. To add evidence, select the
Evidence Type from the drop-down list:
o If you select
Document, go to step 8.
o If you select
Other, go to step 9.
8. Enter the
Evidence Link name. You can view linked evidence on the
Evidence tab of
the
Plan Approval case. To learn more about linking evidence, go to article Add and
link evidence to a case.
9. Enter the
Evidence Explanation into the free text field.
10. Select
Save.
11. Select
Submit.
Note: once the overall decision is made, this can't be changed.
12. In the
Plan Change case, select the
Decision tab.
13. Select
Generate Decision Letter.
14. Select
Yes at
Are you sure you want to generate the Decision Letter? 15. Select
Submit.
To view decision letters, go to article Understand and view plan change decision letters.
Notes:
• if the participant has a statutory guardian and the relationship is established with an
organisation account, you'll need to manually send the auto-created Decision letter to
the statutory guardian. To do this, go to article Send a letter to a statutory guardian or
trustee
• if the overall decision is to vary the reassessment date to continue the participant's
current NDIS supports for up to 12 months, you'll need to send the auto-created Plan
Record an overall plan change decision – 8
Page 28 of 173
FOI 24/25-1942
SGP KP Publishing – Make a plan change decision
Continuation letter. This letter is generated when the plan change case is complete and
closed
• if the overall decision is not to vary because a plan reassessment (s48) is needed, you'll
need to create a CEO-initiated plan reassessment (s48) request. Go to article Create a
plan reassessment (s48) request.
4.2 s48 reassessment decisions
The overall decision on a s48 plan change case is determined when making the decision on the
individual plan change request.
1. In the
Plan Change case, select the
Decision tab.
2. Select
Generate Decision Letter.
3. Select
Yes at
Are you sure you want to generate the Decision Letter? 4. Select
Submit.
To view decision letters, go to article Understand and view plan change decision letters.
Note: if the participant has a statutory guardian and the relationship is established with an
organisation account, you'll need to manually send the auto-created Decision letter to the
statutory guardian. To do this, go to article Send a letter to a statutory guardian or trustee.
Record an overall plan change decision – 9
Page 29 of 173
FOI 24/25-1942
SGP KP Publishing – Make a plan change decision
5 Communicate your decision
You'll need to let the participant know once you've made your decision.
You
must use the relevant scripting in section
Discuss a plan change decision of article
Discuss a participant plan change request when contacting the participant or their authorised
representative.
To record your contact attempts, go to article Contact attempts and unable to contact in a plan
change case.
Communicate your decision – 10
Page 30 of 173
FOI 24/25-1942
SGP KP Publishing – Make a plan change decision
6 Add free text sub-justifications
Use the relevant free text sub-justifications by copying and pasting them in the
Details field by
selecting
Edit Detail.
Information in the details field won't print on the plan change decision letter.
Note: You can select multiple free text sub-justifications listed below.
6.1 Plan variation sub-justifications
6.1.1 Not to vary – add crisis or emergency funding in the plan
• There is funding available in the participant's plan which can be used flexibly to meet
their support needs.
• The participant's plan cannot be changed as it is suspended.
• The participant's plan cannot be varied as their situation has changed significantly. The
participant's plan needs to be reassessed.
• Not enough information has been provided to support the participant's request.
• The support the participant has requested can be met by informal, mainstream, or
community supports.
• The evidence provided does not show a significant change in the participant's support
needs that needs urgent crisis or emergency funding.
• The funding requested does not meet the conditions in the rules for the NDIS.
• The information provided does not show the participant's NDIS support needs have
changed significantly.
• The funding requested does not meet the conditions in the NDIS rules. The information
provided does not show a significant change in the participant's support needs is due to
a change in situation.
• The funding requested does not meet the conditions in the NDIS rules. The information
provided does not show a significant change in the participant's support needs is due to
a change in functional capacity.
• The funding requested does not meet the conditions in the NDIS rules. The information
provided does not show a significant change in the participant's support needs is due to
a change in informal supports.
• The funding requested does not meet the conditions in the NDIS rules. The information
provided does not show a significant change in the participant's support needs is due to
a change in living arrangements.
• The funding requested does not meet the conditions in the NDIS rules. The funding
cannot be provided by the NDIS as it is best funded or provided by another
commonwealth, state or territory program.
6.1.2 Not to vary – correct a minor or technical error in the plan
• There are no errors that need to be fixed in the participant's plan.
• The participant's plan cannot be changed as it is suspended.
• The participant's plan cannot be varied. The plan needs to be reassessed to fix an error
and look at other supports in the plan.
Add free text sub-justifications – 11
Page 31 of 173
FOI 24/25-1942
SGP KP Publishing – Make a plan change decision
• The participant's plan cannot be varied. The plan needs to be reassessed, as the
participant's request relates to a significant change in situation and not a technical error.
• The participant's request is to understand how a previous decision was made and not to
fix an error. To request a change to the previous decision, the participant needs to ask
for a review of the original decision.
6.1.3 Not to vary – add supports to the plan
• The participant's plan cannot be changed as it is suspended.
• The support the participant requested does not meet the NDIS funding criteria.
6.1.4 Not to vary – make minor changes to funding in the plan
• The participant's request relates to a previous decision. To request a change to the
previous decision, the participant needs to ask for a review of the original decision.
• The participant's plan cannot be varied. The plan needs to be reassessed, as the
participant has used their funds quicker than expected.
• The information provided shows that the participant can use their funding flexibly to
meet their needs.
• The participant's plan cannot be varied as their situation has changed significantly. The
participant's plan needs to be reassessed.
• The participant's plan cannot be changed as it is suspended.
• Not enough information has been provided to support the participant's request.
• The increase in funding requested does not meet the conditions set out in the rules for
the NDIS.
• The increase in funding requested does not meet the conditions set out in the rules for
the NDIS as it is not for a home modification, vehicle modification or assistive
technology support.
• The increase in funding requested does not meet the conditions set out in the rules for
the NDIS. Additional funding is not required as there's available funding in the plan to
pay for the support.
• The increase in funding requested does not meet the conditions set out in the rules for
the NDIS. The support can stil be provided in the same way as expected in the plan.
• The increase in funding requested does not meet the conditions set out in the rules for
the NDIS. The support in the plan can be provided without additional information,
services or materials.
• The participant's plan cannot be varied. The plan needs to be reassessed to make a
minor change to the plan and look at other supports in the plan.
6.1.5 Not to vary – make minor change to supports in the plan
Note: you'll need to add this free text sub-justification into the
Details field for 'Make minor
changes to funding in the plan'.
• The participant's request relates to a previous decision. To request a change to the
previous decision, the participant needs to ask for a review of the original decision.
• The participant's plan cannot be varied. The plan needs to be reassessed to look at
other supports in the plan.
• The request is for a support that is not in line with what the NDIS rules say we can fund.
Add free text sub-justifications – 12
Page 32 of 173
FOI 24/25-1942
SGP KP Publishing – Make a plan change decision
• The information provided shows the support requested is the same as a support
already in the plan.
• The request is for a support that is not in line with what the NDIS rules say we can fund.
The support isn't for a set period of time or a one-off support.
• The request is for a support that is not in line with what the NDIS rules say we can fund.
The support requested isn't to replace, repair or maintain assistive technology funded in
the current or previous plan.
• The request is for a support that is not in line with what the NDIS rules say we can fund.
The support requested isn't urgently needed to support economic participation for a set
period of time.
• The request is for a support that is not in line with what the NDIS rules say we can fund.
The support requested isn't urgently needed to help build skil s or support a life change
over a set period of time.
• The request is for a support that is not in line with what the NDIS rules say we can fund.
The support requested is the same as or has the same outcome as a support already
provided in the plan.
• The information provided shows the support requested can be met by informal,
community and mainstream supports.
• The participant's plan cannot be varied. The plan needs to be reassessed as the
changes the participant has asked for are too significant to consider in a variation.
• The participant's plan cannot be changed as it is suspended.
• Not enough information has been provided to support the participant's request.
6.1.6 Not to vary – change the plan reassessment date
• A plan cannot go for more than 5 years without a reassessment. This means we'll work
with you to create a new plan before your plan's current reassessment date.
• The participant's plan cannot be changed as it is suspended.
• The participant's plan cannot be varied. The plan needs to be reassessed, to change
the reassessment date and look at other supports in the plan.
• The participant's plan cannot be varied as their situation has changed significantly. The
participant's plan needs to be reassessed.
• The information provided shows that the participant can use their funding flexibly to
meet their needs.
6.1.7 Not to vary – change the plan management type
• The plan nominee is bankrupt or insolvent under administration.
• There is evidence that the participant is bankrupt or insolvent under administration.
• The participant has been convicted of an offence punishable for 2 or more years in
prison or involves fraud or dishonesty.
• The plan nominee has been convicted of an offence punishable for 2 or more years in
prison or involves fraud or dishonesty.
• The participant's plan cannot be changed as it is suspended.
• The participant's plan cannot be varied. The plan needs to be reassessed, to change
the plan management type and look at other supports in the plan.
• The type of plan management requested poses an unreasonable risk, even with
supports, safeguards and strategies in place.
Add free text sub-justifications – 13
Page 33 of 173
FOI 24/25-1942
SGP KP Publishing – Make a plan change decision
• The rules for the NDIS say these supports cannot be self-managed.
• There is evidence of non-compliance with requests to provide required information or
documents.
• There is evidence of conduct involving fraud or mismanagement or misuse of funds or
other assets.
• There is evidence of the participant or the person managing the funding being
subjected to legal or financial exploitation or coercion.
• There is evidence the participant or the person managing the funding does not have
capacity to make decisions or appropriately manage finances.
• The funding is unlikely to be spent on NDIS supports.
• The funding is unlikely to be spent in line with the plan.
• The funding is unlikely to be spent on NDIS supports and in line with the plan.
6.1.8 Vary – add crisis or emergency funding
• Urgent crisis or emergency funding is needed for a period of time or one off due to the
significant change in support needs.
6.1.9 Vary – change the plan management type
• The participant's plan can be self-managed by the participant.
• The participant's plan can be self-managed by their nominee.
• The participant's plan can be agency-managed as requested.
• The participant's plan can be plan-managed by a registered plan management provider
as there is no evidence of unreasonable risk to the participant.
6.1.10 Vary – correct a minor or technical error in the plan
• The participant's plan is being varied to correct the error in how their funded supports
are calculated.
• The participant's plan is being varied to correct an error.
• The participant's plan is being varied to correct the error in how their funding is
managed.
6.1.11 Vary – make minor change to the funding in the plan
• The information provided shows a minor change to the funding in the plan wil meet the
participant's needs and the conditions in the NDIS rules.
6.1.12 Vary – make minor change to the supports in the plan
Note: you'll need to add this free text sub - justification into the Details field for 'Make minor
changes to funding in the plan'.
• The information provided shows a minor change to the supports in the plan wil meet
the participant's needs and the NDIS funding criteria.
Add free text sub-justifications – 14
Page 34 of 173
FOI 24/25-1942
SGP KP Publishing – Make a plan change decision
6.1.13 Vary – change the plan reassessment date
• The participant's plan is being varied to change the reassessment date as the evidence
shows the current plan is likely to continue to meet the participant's needs.
6.2 Plan reassessment justifications
6.2.1 Not to reassess – change in situation
• The information provided shows that the participant can use their funding flexibly to
meet their needs.
• Not enough information has been provided to support the participant's request.
• The information provided does not show a significant change in the participant's need
for NDIS supports due to a change in situation.
• There is no new information which shows the participant's need for NDIS supports has
significantly changed.
6.2.2 Not to reassess – change to the funding in the plan
• There is no new information which shows the participant's need for NDIS supports has
significantly changed.
• Not enough information has been provided as to why the participant needs the support.
• The support the participant has requested does not relate to their disability.
• The changes requested can be considered when the plan is due for reassessment.
• The support the participant has requested should be met by informal, mainstream, or
community supports.
• There has been no change to the participant's entitlement to compensation.
• There has been no change to the participant's right to personal injury supports under a
scheme of insurance or commonwealth, state or territory law.
6.2.3 Not to reassess – change while the plan is suspended
• The participant's plan cannot be changed as it is suspended.
6.2.4 Reassess – change in situation
• The participant's plan wil be reassessed.
• The information provided shows that a minor change wil meet the participant's needs
and the NDIS funding criteria.
6.2.5 Reassess – change to the funding in your plan
• The information provided shows that a minor change to the supports in the plan wil
meet the participant's needs and the NDIS funding criteria.
• The change the participant has requested meets the NDIS funding criteria. We wil
contact the participant to make a time to work with them to create a new plan.
Add free text sub-justifications – 15
Page 35 of 173
FOI 24/25-1942
SGP KP Publishing – Make a plan change decision
7 Next steps
You or another delegate may complete the next steps. This wil depend on the routing of the
case.
• For a variation, from the
Plan Change case, select the
Budget Update tab. To
complete the plan variation, go to article Action a budget update.
• For a reassessment, from the
Plan Change case, select the
Reassessment tab.
Select the
Case hyperlink to open the
Plan Approval case to complete the
reassessment. Go to article Change the draft budget.
• For decisions not to vary or reassess, no further steps are needed. Correspondence
has been generated, and the plan change case wil move to the
Completed stage. The
plan change case is now closed.
Next steps – 16
Page 36 of 173
DOCUMENT 3
FOI 24/25-1942
Add or update a provider
relationship
SGP KP Publishing
Exported on 2025-05-11 23:18:58
Page 37 of 173
FOI 24/25-1942
SGP KP Publishing – Add or update a provider relationship
Table of Contents
1 Recent updates . . . . . . . . . . . . . . . . . . . . . . . . . . . . . . . . . . . . . . . . . . . . . . . . . . . . . . . . . . 4
2 Before you start . . . . . . . . . . . . . . . . . . . . . . . . . . . . . . . . . . . . . . . . . . . . . . . . . . . . . . . . . . 5
3 Action a provider's proposal to add, edit or extend a provider relationship . . . . . . . . . 6
4 Add a provider relationship . . . . . . . . . . . . . . . . . . . . . . . . . . . . . . . . . . . . . . . . . . . . . . . . 7
5 Edit a provider relationship . . . . . . . . . . . . . . . . . . . . . . . . . . . . . . . . . . . . . . . . . . . . . . . . . 9
6 Next steps . . . . . . . . . . . . . . . . . . . . . . . . . . . . . . . . . . . . . . . . . . . . . . . . . . . . . . . . . . . . . . 11
Table of Contents – 2
Page 38 of 173
FOI 24/25-1942
SGP KP Publishing – Add or update a provider relationship
This article provides guidance for a planner delegate, planner (non-partnered area), review
officer, complaints officer, participant support officer, access delegate, technical advisor, local
area coordinator, early childhood partner, and the National Contact Centre to:
• action a provider's proposal to add, edit or extend a relationship
• add a provider relationship
• edit a provider relationship.
Recent updates – 3
Page 39 of 173
FOI 24/25-1942
SGP KP Publishing – Add or update a provider relationship
1 Recent updates
16 September 2024
Updated guidance to:
• explain support coordinators and psychosocial recovery coaches (recovery coaches)
are not to be added as providers and a request for service needs to be completed
• explain participants who have Agency-managed funds to pay for NDIS supports, can
accept or decline provider relationship requests in the my NDIS participant portal
• explain participants who have Agency-managed funds to pay for NDIS supports, can
change the information they consent to share with providers in the my NDIS participant
portal
• add link to new article my NDIS portal – Understand provider relationships and consent
to share information.
Recent updates – 4
Page 40 of 173
FOI 24/25-1942
SGP KP Publishing – Add or update a provider relationship
2 Before you start
You have read and understood:
• Our Guideline – Your plan (external)
• article Understand provider relationships
• article Understand sharing the participant's plan information with providers.
You have confirmed:
• the participant's preferred contact method
• the participant (or their authorised representative) would like to create a new provider
relationship
• the provider has agreed to be the participant's registered plan manager or my provider
• the participant has approved funding in their plan
• the participant has given their consent to share information in their plan with the
provider
• you aren't trying to add a support coordinator or recovery coach as a provider. You'll
need to complete a request for service instead. Go to article Complete the request for
service.
Before you start – 5
Page 41 of 173
FOI 24/25-1942
SGP KP Publishing – Add or update a provider relationship
3 Action a provider's proposal to add, edit or extend a
provider relationship
Registered providers and registered plan managers can send a request from the my NDIS
provider portal to:
• add a new provider relationship with the participant
• edit the end date to end their relationship with the participant
• extend their relationship with the participant.
Providers can only request relationships in the my NDIS provider portal with participants who
have a plan in PACE, that has Agency-managed funds to pay for NDIS supports.
Participants who have a plan in PACE that has Agency-managed funds to pay for NDIS
supports, can accept or decline provider relationship requests in the my NDIS participant portal.
Participants can also change the information they consent to share with their providers. Help the
participant do this using article my NDIS portal – Understand provider relationships and consent
to share information.
Note: Provider relationship requests sent through the my NDIS provider portal for participants
without my NDIS participant portal access, wil be routed to the National Contact Centre (NCC)
for action. Unactioned provider relationship requests sent through the my NDIS provider portal
for participants with my NDIS participant portal access, wil be routed to the NCC for further
action after 7 days.
In the manage provider relationship case, you can review and confirm the provider's request.
Talk with the participant (or their authorised representative) to confirm that they understand and
consent to this relationship.
At the
Confirm Proposal screen:
1. Select who the relationship was
Confirmed By from the drop-down options.
2. Select the
Confirmation Date using the calendar. For example, the date you spoke
with the participant about the provider's request.
3. Select the relevant
Consent Method from the drop-down options.
4. Select the relevant
Proposal Outcome from the drop-down options. Select
Next.
Note: Before you select
Unable to contact, follow the process in article Contact attempts and
unable to contact in a manage provider relationship case.
At the
Summary screen:
1. Review the summary information to confirm the details are correct. If they are:
o incorrect, select
Previous and make any required changes
o correct, select
Submit.
At the
Confirmation screen:
1. Select
Done. The case wil move to the closed stage.
Action a provider's proposal to add, edit or extend a provider relationship – 6
Page 42 of 173
FOI 24/25-1942
SGP KP Publishing – Add or update a provider relationship
4 Add a provider relationship
In the manage provider relationship case, you can add a new provider relationship for a
registered plan manager or my provider.
From the
Person Account:
1. Select the
Cases tab.
2. Select
New.
From the
New Case tab:
1. Select
Manage Provider Relationship.
2. Select
Next.
At the
New Case: Manage Provider Relationship screen:
1. Select the relevant
Case Origin from the drop-down options.
2. Select
Save.
3. Select the
Manage Provider Relationship tab. Follow the
Steps to add a relationship.
At the
Requestor Information screen:
1. Select who requested the relationship from the options:
o If you select
Participant go to step 3.
o If you select
Authorised Representative go to step 2.
o If you select
Provider, you can only edit the relationship. Go to section
Edit a
provider relationship.
2. Select
Next. At the
Authorised Representative screen, select the representative's role
from the options.
3. Select
Next.
At the
Request Information screen:
1. Select the
Requested Date using the calendar.
2. Select the relevant
Consent Method from the drop-down options.
3. Select
Add at
Do we want to Add or Edit relationship? 4. Select
Next.
At the
Select Role screen:
1. Select the relevant
Role from the options:
o If you select
Registered Plan Manager go to step 3.
o If the participant is using a registered plan manager to help manage their plan
funding, select
Registered Plan Manager. Once the relationship is added they
wil be able to see the participant's details, goals, plan managed supports and
budget. Learn more about what registered plan managers wil have access to in
article Understand sharing the participant's plan information with providers.
o If you select
My Provider go to step 2.
2. Select
Next. At the
Consent to Share Plan screen, select
Yes or
No at
Has the
participant provided consent to share their plan information with the provider?
Note: Plan information includes the participant's goals. If you select
No the participant
hasn't provided consent, you'll change any consent previously recorded. This won't
change the consent if the provider is also a
Registered Plan Manager. Learn more
about what my providers wil have access to in article Understand sharing the
participant's plan information with providers.
Add a provider relationship – 7
Page 43 of 173
FOI 24/25-1942
SGP KP Publishing – Add or update a provider relationship
3. Select
Next.
At the
Add Provider Relationship screen:
1. Search and add the relevant support category from the drop-down options.
Note: Check if the participant's plan includes Agency-managed supports including home
and living, behaviour support or specialist disability accommodation (SDA). If these
supports are in the participant's plan, ask the participant about their provider. You'll
need to add them as a provider relationship. If the participant doesn't know, make sure
you add it as soon as they do. This is important so the provider can access funds.
2. Select
New.
3. The
Click New to add Provider Relationship screen wil appear.
4. Record the name of the provider in
Search Providers.
5. Select the
Start Date using the calendar.
Note: Make sure the
Start Date is the same as the date when the participant tells us they
started receiving services, not when the role is being created.
6. Select the
End Date using the calendar.
Note: Make sure you select the end date for one-off supports. If the participant has
confirmed that the role is ongoing, leave the end date blank.
7. Select
Save.
8. Select
Next.
At the
Summary screen:
1. Review the summary information to confirm the details are correct. If they're:
o incorrect, select
Previous and make any required changes
o correct, select
Submit.
At the
Confirmation screen:
1. Select
Done. The case wil move to the closed stage.
Add a provider relationship – 8
Page 44 of 173
FOI 24/25-1942
SGP KP Publishing – Add or update a provider relationship
5 Edit a provider relationship
You can edit or end a provider relationship for an existing provider using the manage provider
relationship case.
Example 1: Edit a relationship. If the participant has confirmed that they'd like the provider to
continue to deliver supports, you can edit the end date.
Example 2: End a relationship. If the participant has requested a new registered plan manager,
you'll need to end the existing relationship.
Note: Participants who have a plan in PACE that has Agency-managed funds to pay for NDIS
supports, can accept or decline provider proposals to extend provider relationships in the my
NDIS participant portal. Help the participant do this using article my NDIS portal – Understand
provider relationships and consent to share information.
From the
Person Account:
1. Select the
Cases tab.
2. Select
New.
From the
New Case tab:
1. Select
Manage Provider Relationship.
2. Select
Next.
At the
New Case: Manage Provider Relationship screen:
1. Select the relevant
Case Origin from the drop-down options.
2. Select
Save.
3. Select the
Manage Provider Relationship tab. Follow the
Steps to edit a relationship.
At the
Requestor Information screen:
1. Select who requested the relationship from the options:
o If you select
Participant go to step 3.
o If you select
Authorised Representative go to step 2.
o If you select
Provider go to step 3.
2. Select
Next. At the
Authorised Representative screen, select the relevant
representative's role from the drop-down options.
3. Select
Next.
At the
Request Information screen:
1. Select the
Requested Date using the calendar.
2. Select the relevant
Consent Method from the options.
3. Select
Edit at
Do we want to Add or Edit relationship? 4. Select
Next.
At the
Edit Provider Relationship screen:
1. Select
Edit.
2. The
Click on Edit screen wil appear.
3. If required, record the
Start Date using the calendar icon.
4. If required, record the
New End Date using the calendar icon.
Edit a provider relationship – 9
Page 45 of 173
FOI 24/25-1942
SGP KP Publishing – Add or update a provider relationship
5. Select
Save.
6. Select
Next.
Note: When you end the participant's relationship with their
Plan Manager, it doesn't
automatically end all provider relationships. You'll need to end both the
Plan Manager
and
My Provider role. The
My Provider role wil have the same start date as the
Plan
Manager role. To end the relationship with the
My Provider role, you'll need to follow
the above steps. This role is automatically created by PACE for claiming and payment
purposes. The participant doesn't need to provide consent to end this relationship.
7. At the
Summary screen, review the summary information to confirm the details are
correct. If they're:
o incorrect, select
Previous and make any required changes
o correct, select
Submit.
At the
Confirmation screen, select
Done. The case wil move to the closed stage.
Edit a provider relationship – 10
Page 46 of 173
FOI 24/25-1942
SGP KP Publishing – Add or update a provider relationship
6 Next steps
Talk with the participant:
• to explain what happens when they end a provider relationship. For more information
go to article Understand provider relationships
• about how they can change providers (if required). For more information go to article
Connect with providers
• about how they can accept or decline provider relationship requests in the my NDIS
participant portal, if they have Agency-managed funds to pay for NDIS supports. Help
the participant do this using article my NDIS portal – Understand provider relationships
and consent to share information
• about how they can change the information they consent to share with providers in the
my NDIS participant portal, if they have Agency-managed funds to pay for NDIS
supports. Help the participant do this using article my NDIS portal – Understand
provider relationships and consent to share information.
Next steps – 11
Page 47 of 173
DOCUMENT 4
FOI 24/25-1942
Create a plan variation (s47A)
request
SGP KP Publishing
Exported on 2025-05-11 23:21:09
Page 48 of 173
FOI 24/25-1942
SGP KP Publishing – Create a plan variation (s47A) request
Table of Contents
1 Recent updates . . . . . . . . . . . . . . . . . . . . . . . . . . . . . . . . . . . . . . . . . . . . . . . . . . . . . . . . . . 4
2 Before you start . . . . . . . . . . . . . . . . . . . . . . . . . . . . . . . . . . . . . . . . . . . . . . . . . . . . . . . . . . 5
3 Create a plan change case . . . . . . . . . . . . . . . . . . . . . . . . . . . . . . . . . . . . . . . . . . . . . . . . . 6
4 Create a plan variation (s47A) request . . . . . . . . . . . . . . . . . . . . . . . . . . . . . . . . . . . . . . . 7
4.1 Plan change requests ......................................................................................................... 8
4.2 Emergency or crisis funding ............................................................................................... 8
4.3 Fund management type ...................................................................................................... 9
4.4 Reassessment date ............................................................................................................ 9
4.5 Minor variation that results in an increase to the funding of supports under the
participant's plan .......................................................................................................................... 10
4.6 Minor change to funded NDIS supports ........................................................................... 11
4.7 Risk Matrix ........................................................................................................................ 11
4.7.1
If you don't identify any risks: ...................................................................................................... 11
4.7.2
If you do identify a risk: ............................................................................................................... 11
4.8 Request Confirmation ....................................................................................................... 11
5 Understand and update the case reason in the plan change case . . . . . . . . . . . . . . . . 13
6 Next steps . . . . . . . . . . . . . . . . . . . . . . . . . . . . . . . . . . . . . . . . . . . . . . . . . . . . . . . . . . . . . . 15
Table of Contents – 2
Page 49 of 173
FOI 24/25-1942
SGP KP Publishing – Create a plan variation (s47A) request
This article provides guidance for a local area coordinator, early childhood partner, planner
delegate, payments officer, review officer, complaints officer, participant support officer, access
delegate, technical advisors, National Contact Centre, liaison officers (HLO/JLO) or planner
(non-partnered area) to:
• create a plan change case
• create a plan variation (s47A) request
• understand and update the case reason in the plan change case.
Note: this article is for plan variation (s47A) requests only. Don't use this article for a plan
reassessment request (s48) or a participant requested plan change where the legislative type
isn't specified. You'll need to go to article Create a plan reassessment (s48) request or Create a
participant plan change request where the legislative type isn't specified.
Recent updates – 3
Page 50 of 173
FOI 24/25-1942
SGP KP Publishing – Create a plan variation (s47A) request
1 Recent updates
17 March 2025
Updates to the plan continuation process and streamlined planning approach, based on
recommended confidence levels in PACE.
Recent updates – 4
Page 51 of 173
FOI 24/25-1942
SGP KP Publishing – Create a plan variation (s47A) request
2 Before you start
You have:
• received a plan variation (s47A) request from a participant or their authorised
representative, or you're creating a CEO-initiated s47A request
• identified a need to create a CEO-initiated s47A request and you're a delegate with
authority to make a CEO-initiated decision
• completed steps in article Prepare to submit a plan change request
• read and understood Our Guideline – Changing your plan (external).
Before you start – 5
Page 52 of 173
FOI 24/25-1942
SGP KP Publishing – Create a plan variation (s47A) request
3 Create a plan change case
You can receive a plan change request verbally, in an email or a change of details or change of
situation form. The change of details or change of situation form doesn't have to be completed
to submit a plan change request, however supporting evidence or information should be
provided.
When you speak with the participant or their authorised representative, you
must use the
scripting in section
Check supporting information to submit a plan change of article Discuss
a participant plan change request.
To request changes to a participant's plan, you'll need to create a plan change case. A plan
change case can also be initiated from other cases. For example, from a reassessment check-
in case, where the recommendation and decision after the check-in meeting is to continue the
participant's current NDIS supports for up to 12 months. To learn more, go to section
Plan
continuations in article Understand and choose the right plan change request.
To create a plan change case:
1. From the
Person Account, select the
Cases tab.
2. Select
New.
3. Select
Plan Change from the list of case types.
4. Select
Next.
5. Select
Case Origin from the drop-down list.
6. Select
Case Reason from the drop-down list. To learn more about each reason, go to
the table in section
Understand and update a case reason in the plan change case
in this article.
7. Add
Internal Comments about the case, if needed.
8. Select
Save. You have now created the plan change case.
Create a plan change case – 6
Page 53 of 173
FOI 24/25-1942
SGP KP Publishing – Create a plan variation (s47A) request
4 Create a plan variation (s47A) request
A plan variation can be requested at any time, but for us to decide to vary the plan it needs to
meet specific criteria. To make sure the request meets the criteria for a plan variation, go to Our
Guidelines – Changing your plan (external).
Note:
• You can't create a s47A if the participant's plan is stil on SAP CRM. You'll need to
create the plan change case as CEO's own initiative s48.
• When a participant is eligible for SDA but hasn't located an enrolled dwelling or isn't
ready to move in, a $1 amount is included in the SDA support category as a
placeholder. The plan comment is used to let them know of the SDA decision. Once the
participant finds an enrolled SDA dwelling and confirms they can move in, we can
consider a s47A to include the SDA funding. The s47A can only be considered when
the request is only for SDA funding. For this request, select
Minor change to the
funding checkbox in the
Plan change requests section of this article to progress the
request. Make sure the
Case Reason and
Subject is updated accurately. Go to section
Understand and update the case reason in the plan change case in this article to
learn more.
• You must continue with the plan change case generated from a reassessment check-in
case, where we've recommended and decided to continue the participant's current
NDIS supports for up to 12 months. This is a plan continuation, after a reassessment
check-in.
Use below steps for a participant requested or CEO's own initiative variation request:
1. From the
Plan Change case, select the
Request tab.
2. Select the
Requested Date of the plan change. This wil default to today's date.
Note: plan change requests can be backdated.
3. Under How is the request being initiated?, select either:
o
Participant requested – S47A: Only use this option when the participant
specifically requests a plan variation. This is for minor changes in the plan. For
example, to add short-term supports until a reassessment can be completed,
and other changes which can be made under s47A. If you create this request, a
delegate can only make a decision to vary or not to vary.
o
CEO's own initiative – S47A: These requests should
only be created by
delegates who have authority to make a CEO-initiated decision. Use this option
when you've decided this is the plan change type needed. This is for minor
changes in the plan. For example, to add short-term supports until a
reassessment can be completed, and other changes which can be made under
s47A. Or to change the reassessment date, after a reassessment check-in to
continue the participant's current NDIS supports for up to 12 months.
4. Select
Who is requesting the plan change?. If you select
Related Party, then select
the authorised representative making the request from the list.
Note: NDIA wil be the only option if creating a CEO's own initiative request.
Create a plan variation (s47A) request – 7
Page 54 of 173
FOI 24/25-1942
SGP KP Publishing – Create a plan variation (s47A) request
5. Select
Next.
Note: Save for Later won't work when you add a new plan change request in the same
plan change case after it's been submitted.
4.1 Plan change requests
To progress the plan change request, select the checkbox next to each plan change request
that applies:
•
An emergency situation has occurred that impacts the funding needs. Go to
section
Emergency or crisis funding in this article.
•
Change to the fund management type. Go to section
Fund management type in this
article.
•
Change the reassessment date. Go to section
Reassessment date in this article.
•
A correction of a minor or technical error. Go to section
Minor variation that
results in an increase to the funding of supports under the participant's plan in
this article.
•
Minor change to the funding. Go to section
Minor change to funded NDIS supports
in this article.
When you select a checkbox, it'll automatically add the change request to the workflow for
completion. Complete the relevant steps for each plan change request you select.
4.2 Emergency or crisis funding
We can only vary a plan to add emergency or crisis funding if there is a significant change to the
participant's support needs.
For more information go to section
Add crisis or emergency supports because of a
significant change to your NDIS support needs in Our Guideline – Changing your plan
(external).
Follow the steps below to record a request due to an emergency situation:
1. Select
Date (calendar) for
When did the emergency situation first happen? 2.
Describe the emergency situation in the free text field.
3.
Record details which support the request in the free text field.
4. Select
Next.
5. If applicable, use the
Documents tab to add documents related to the emergency
situation. Refer to articles Add documents to a case and Add and link evidence to a
case.
6. Select
Next.
Create a plan variation (s47A) request – 8
Page 55 of 173
FOI 24/25-1942
SGP KP Publishing – Create a plan variation (s47A) request
4.3 Fund management type
To understand what a change to a plan management type is go to section
Update how the
funds or other aspects of your plan are managed in Our Guideline – Changing your plan
(external).
When you record a request to change the fund management type, record:
• how the participant or authorised representative wants the funding for NDIS supports to
be managed
• any unreasonable risks impacting a participant's situation. For example, if the
participant becomes insolvent under administration, they can't self-manage the supports
in their plan
• information relating to the misuse of funds. This wil impact the management of funding
for NDIS supports under the plan.
Follow the steps below to record a request to change the fund management type:
1. Select the
Update checkbox next to the support categories if a change to the fund
management type is requested.
2. Select the
Plan Management Type from the drop-down list.
3.
Capture Details of the change in fund management in the free text field.
4.
Provide detailed reasoning for request in the free text field.
5. If you need to update fund management for another support category, go back to step
1. Otherwise, select
Next.
6. If applicable, use the
Documents tab to add documents relating to the change in fund
management. Refer to articles Add documents to a case and Add and link evidence to
a case.
7. Select
Next.
4.4 Reassessment date
This type of request is to bring forward or extend the reassessment date. For example:
• when a participant would prefer to have a longer plan duration and their support needs
are stable
• after the reassessment check-in we've listened to the participant, and stil decide a plan
continuation is the most suitable approach.
To learn more go to section
Change the reassessment date of your plan in Our Guideline –
Changing your plan (external).
Before you create a request to change the reassessment date, make sure the participant or
their authorised representative:
• is continuing to work towards pursuing the same plan goals
Create a plan variation (s47A) request – 9
Page 56 of 173
FOI 24/25-1942
SGP KP Publishing – Create a plan variation (s47A) request
• agrees to continue with the same supports in their plan
• confirms their current funded NDIS supports wil meet their ongoing needs
• confirms their support needs and situation are likely to be stable for the new plan
duration
• understands their options for an internal review if they disagree with the plan
reassessment date
• understands they can ask for a plan change if their situation changes before their next
plan reassessment.
Follow the steps below to record a request to change the reassessment date:
1. Select the
New Reassessment Date Year from the drop-down list.
2. Select the
New Reassessment Date month from the drop-down list.
3. Select
Calculate New Reassessment Date.
4.
Capture Details of the request to change the reassessment date in the free text field.
Note: for a plan continuation include specific details. For example, the plan is to be
continued for a year under plan continuation process.
5.
Provide detailed reasoning for request in the free text field.
Note: include specific reasons why the participant would like to change the
reassessment date. For example, after checking the participant's plan during the
reassessment check-in, the decision to continue their plan is made and a request is
initiated. Or, the participant's disability or living situation isn't stable. Or, the participant
entered the NDIS under the early intervention criteria and is likely to have met their
goals and likely to leave the scheme in the next 3 years.
6. At
Request Confirmation, select the checkbox.
7. Select
Next.
8. If applicable, use the
Documents tab to add any documents relating to the change in
reassessment date. Refer to articles Add documents to a case and Add and link
evidence to a case.
9. Select
Next.
4.5 Minor variation that results in an increase to the funding of
supports under the participant's plan
To understand what can be changed under a minor or technical error, go to section
Fix a smal
or technical error in Our Guideline – Changing your plan (external).
Follow the steps below to record a request to fix a minor or technical error:
1.
Capture Details of the error in the free text field.
2.
Provide detailed reasoning for request in the free text field.
3. Select
Next.
4. If applicable, use the
Documents tab to add any evidence related to a minor or
technical error. Refer to articles Add documents to a case and Add and link evidence to
a case.
Create a plan variation (s47A) request – 10
Page 57 of 173
FOI 24/25-1942
SGP KP Publishing – Create a plan variation (s47A) request
5. Select
Next.
4.6 Minor change to funded NDIS supports
It's important to remember that adding a significant amount of funding wouldn't be considered a
minor change. To learn more about changes to the statement of participant supports in the
current plan or about the funding of supports under the plan, go to section
What is a plan
variation? in Our Guideline – Changing your plan (external).
Note: this checkbox can be used when a plan change request is only to include SDA funding.
This is considered a minor change as the participant is eligible for SDA. The placeholder
amount in the SDA support category is used to inform the participant of their eligibility and
allows them to locate a suitable enrolled SDA dwelling.
To record a request about a minor change in funding:
1. If the request is for an
existing support, select the
Update checkbox next to the
support category where a change of funding is being requested. If the request is for a
new support category, select the
Support Category from the drop-down list.
2.
Describe change to funding for each selected/added support category in the free
text field.
3.
Provide detailed reasoning for request in the free text field.
4. If you need to update or add an additional support category, go back to step 1.
Otherwise, continue to step 5.
5. Select
Next.
6. If applicable, use the
Documents tab to add any documents relating to a change in
funding for a support category. Refer to articles Add documents to a case and Add and
link evidence to a case.
7. Select
Next.
4.7 Risk Matrix
Check for any risks associated with the plan change request which could impact on the
participant, nominee or the NDIS.
4.7.1 If you don't identify any risks:
1. Select
No.
2. Select
Next to progress the case.
4.7.2 If you do identify a risk:
1. Go to article Identify and escalate risks in a plan change request to complete this
section.
4.8 Request Confirmation
1. To review or update information, select the section in the
Steps workflow.
Create a plan variation (s47A) request – 11
Page 58 of 173
FOI 24/25-1942
SGP KP Publishing – Create a plan variation (s47A) request
2. You need to check the
Case Reason of the plan change case is correct so it can be
routed efficiently. To do this, go to section
Understand and update the case reason
in the plan change case in this article. Review the case reasons and update if needed.
Once completed, return here and go to step 3.
3. Select the checkbox at
I confirmed the information recorded is accurate
(mandatory in order to proceed for submit).
4. Select
Submit.
Note: don't manually move the case status from
Draft. Refresh your browser after you submit
the plan change request. The case status wil automatically change to
New.
A Plan Change Request Received letter wil be generated once the plan change case has been
submitted. This letter wil not be sent to the participant if this a plan continuation.
Note: if the participant has a statutory guardian and the relationship is established with an
organisation account, you'll need to manually send the auto-created
Plan Change Request
Received letter to the statutory guardian. To do this, go to article Send a letter to a statutory
guardian or trustee.
Create a plan variation (s47A) request – 12
Page 59 of 173
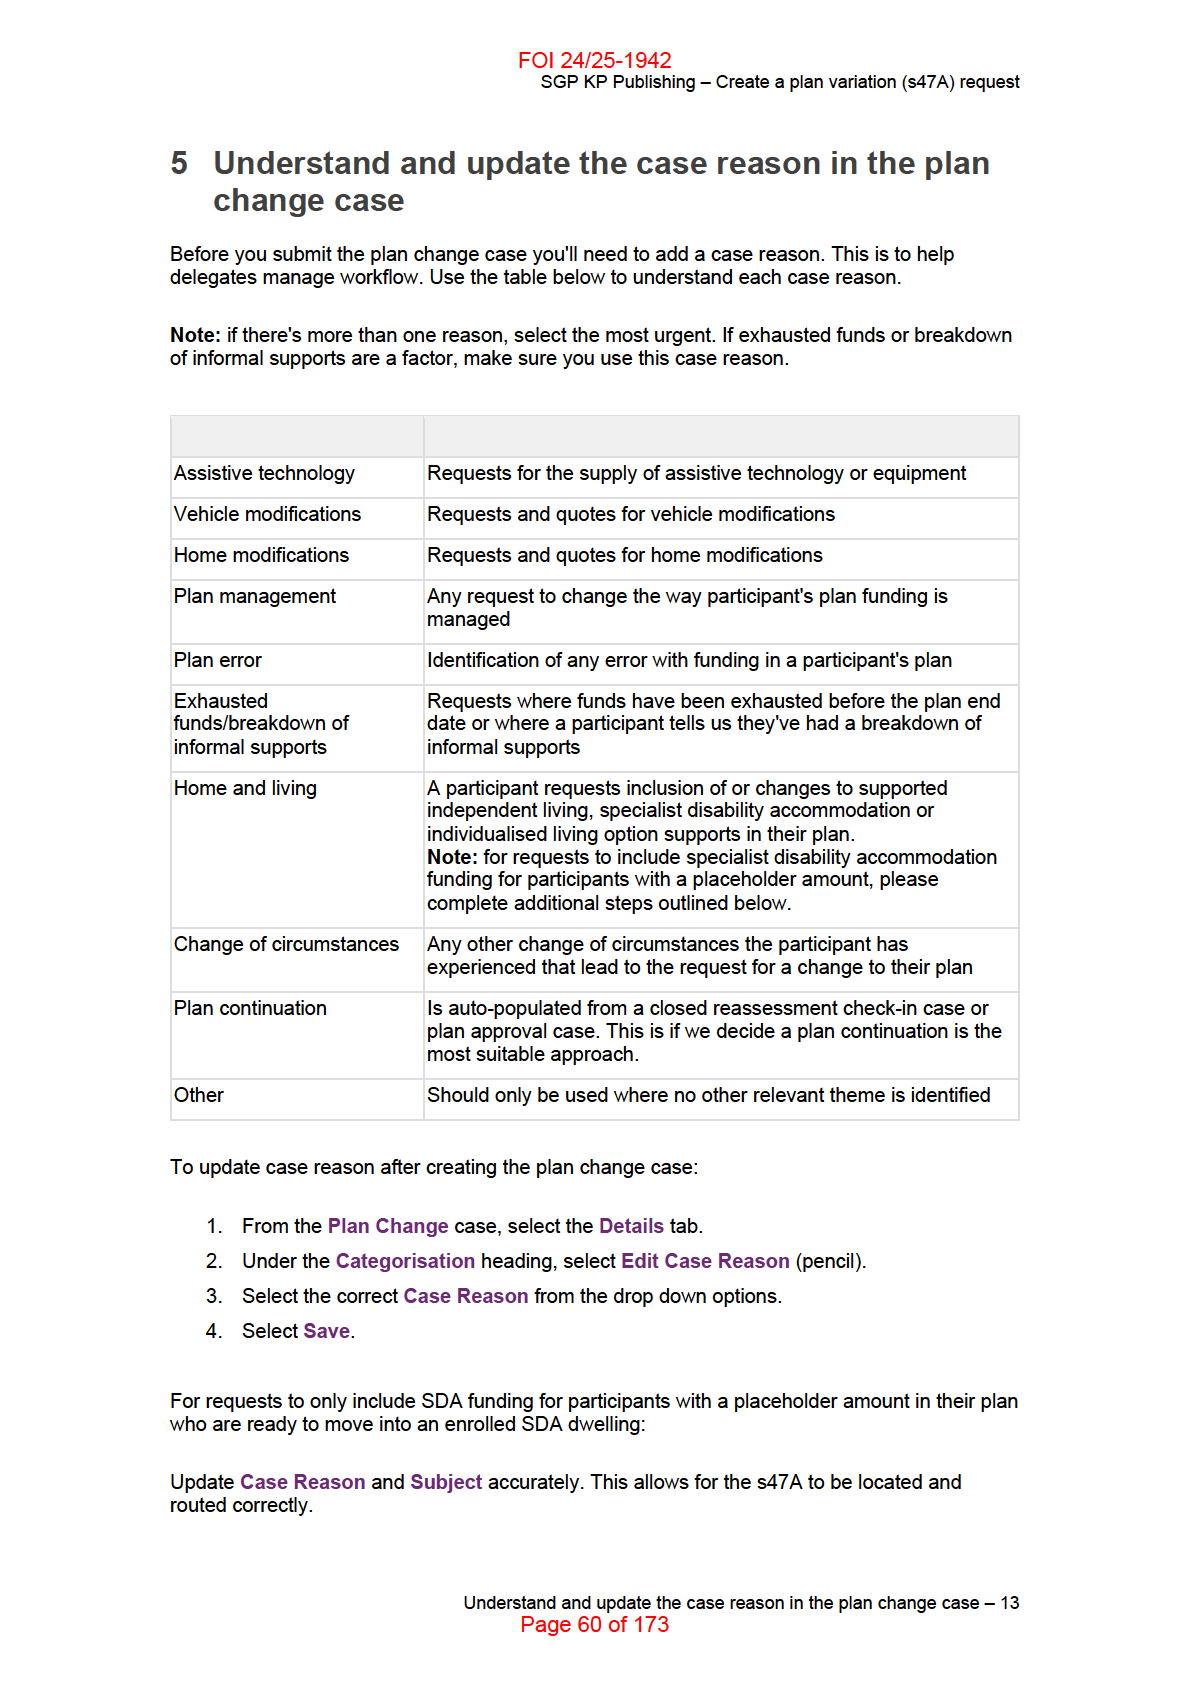
FOI 24/25-1942
SGP KP Publishing – Create a plan variation (s47A) request
1. From the
Plan Change case, select the
Details tab.
2. Under the
Categorisation heading, select
Edit Case Reason (pencil).
3. From the
Case Reason drop-down list, select
Home & Living.
4. Select
Save.
5. Under the
System Information heading, select
Edit Subject (pencil) and update the
free text field to exactly
SDA Provider Confirmed.
6. Select
Save.
Understand and update the case reason in the plan change case – 14
Page 61 of 173
FOI 24/25-1942
SGP KP Publishing – Create a plan variation (s47A) request
6 Next steps
Once submitted, a plan change case wil automatically be allocated to the
Plan Change Hold
Queue. The request information wil no longer be available under the
Request tab in the
Plan
Change case.
• If you're not the decision maker on the plan change request, there are no further steps.
• If you're the delegate making the decision, assign the plan change case to yourself and
review the case. Go to article Assign and review a plan change case.
Next steps – 15
Page 62 of 173
DOCUMENT 5
FOI 24/25-1942
Add budget justifications
SGP KP Publishing
Exported on 2025-05-11 23:25:02
Page 63 of 173
FOI 24/25-1942
SGP KP Publishing – Add budget justifications
Table of Contents
1 Before you start . . . . . . . . . . . . . . . . . . . . . . . . . . . . . . . . . . . . . . . . . . . . . . . . . . . . . . . . . . 4
2 Why we record justifications . . . . . . . . . . . . . . . . . . . . . . . . . . . . . . . . . . . . . . . . . . . . . . . 5
3 Free text guidelines . . . . . . . . . . . . . . . . . . . . . . . . . . . . . . . . . . . . . . . . . . . . . . . . . . . . . . . 6
4 Free text examples for declined supports . . . . . . . . . . . . . . . . . . . . . . . . . . . . . . . . . . . . . 7
4.1 Example 1 - Section 34(1)(a) The information you gave us does not show this support
wil help you pursue the goals in your NDIS plan. ......................................................................... 7
4.2 Example 2 - Section 34(1)(b) The information you gave us does not show this support
wil help you do things that wil increase your social and economic participation. ........................ 7
4.3 Example 3 - Section 34(1)(c) The information you gave us does not show this support is
value for money. This means there are different supports that are better value for money
because they can give you the same or better outcomes. ............................................................ 7
4.4 Example 4 - Section 34(1)(d) The information you gave us does not show enough
evidence this support is likely to be effective and beneficial for you. I looked at best practice and
the evidence you provided to make this decision. ......................................................................... 8
4.5 Example 5 - Section 34(1)(e) This support is something it’s reasonable to expect your
informal supports, like family and friends, to provide. ................................................................... 8
4.6 Example 6 - Section 34(1)(f) This support is something that another government service
is responsible for providing. ........................................................................................................... 9
4.7 Example 7 - Rule 5.1(a) I have not approved this support because it is likely to cause
harm to you or pose a risk to other people. We need to consider risk of harm for all supports,
such as support workers, therapies or equipment. ....................................................................... 9
4.8 Example 8 - Rule 5.1(b) I have not approved this support because the information you
gave us doesn’t show this support addresses your disability support needs. Your disability
support needs are those that arise from, or are caused by, your disability. ................................. 9
4.9 Example 9 - Rule 5.1(c) I have not approved this support because it would duplicate
other supports provided by the NDIS. ......................................................................................... 10
4.10
Example 10 - Rule 5.1(d) I have not approved this support because it is related to a
‘day-to-day living cost’, such as groceries, rent or utilities, that are not attributable to your
disability support needs. These are costs that are not caused by or a result of your disability
support needs. ............................................................................................................................. 10
4.11
Example 11 - Rule 5.3 (a) I have not approved this support because it is not legal,
either under Australian government law or under a law that only applies in your state or territory.
10
Table of Contents – 2
Page 64 of 173
FOI 24/25-1942
SGP KP Publishing – Add budget justifications
This article provides guidance for a
planner to:
• understand why we record justifications
• understand free text guidelines for adding approved and declined support justifications
• view free text examples for declined supports justifications.
Before you start – 3
Page 65 of 173
FOI 24/25-1942
SGP KP Publishing – Add budget justifications
1 Before you start
You have:
• made a decision to approve or decline a support using article
Change the budget.
Before you start – 4
Page 66 of 173
FOI 24/25-1942
SGP KP Publishing – Add budget justifications
2 Why we record justifications
The National Disability Insurance Agency (NDIA) requires you to complete reasons for your
decision.
Legislation amendments which came into place earlier this year, requires the Agency to give a
reason when making a reviewable decision. We have provided you with free text examples to
help you provide a reason for your decision, using plain English when you decline a support in
the participant’s plan.
We need to make sure we are making good, evidence-based decisions. The most important
part of this is to communicate these decisions clearly – if we do this in a way that is clear and
meaningful, this improves the participant experience.
Being clear about the reasons for our decisions:
• Reflects the principles outlined in the NDIS Participant Service Charter, particularly the
principle of transparency.
• Delivers the ‘communicating with us’ promises in the NDIS Participant Service
Improvement Plan 2020-21.
• Is a requirement of the legislation.
This information can be used:
• to explain decisions at the plan meeting
• to respond to a request for an explanation of decision
• during an internal review of a reviewable decision
• to support an Administrative Appeals Tribunal (AAT) case (external review)
• explain the decision in letters.
Why we record justifications – 5
Page 67 of 173
FOI 24/25-1942
SGP KP Publishing – Add budget justifications
3 Free text guidelines
Follow these guidelines when you record your justifications for approved and declined supports.
• Ensure comments are objective, include facts based on evidence, and avoid personal
opinions or feelings.
• Reference all information the participant has provided in your decision. This includes
any documents or material used in your decision making such as medical reports,
comments, conversations, emails and participant submissions.
• Keep the text short, simple and in plain conversational English.
• Avoid jargon.
• Introduce all acronyms before using them. For example, ‘Assistive Technology (AT)’.
• Cross-check your decision against the statutory criteria to ensure you meet all
necessary sections. Do not include considerations that are not required by the criteria in
the legislation. For example, do not include considerations around whether the
participant can or cannot afford a support.
• Provide the basis for how you reached your decision against each of the criteria in the
legislation. For example, if a support does not meet two of the reasonable and
necessary criteria, explain your decision about both criteria. For approved supports you
wil explain your decision for all criteria.
• Provide the reasoning you used to reach your outcome on the overall matter. For
example, explain what supports you have not included in the participant’s plan.
Free text guidelines – 6
Page 68 of 173
FOI 24/25-1942
SGP KP Publishing – Add budget justifications
4 Free text examples for declined supports
4.1 Example 1 - Section 34(1)(a) The information you gave us
does not show this support wil help you pursue the goals
in your NDIS plan.
You asked us for help for you to be able to cook breakfast in the morning. We haven’t received
any information which indicates you need help in preparing your meals and this request
wouldn’t help you to pursue your goals. You can if you would like to, fund cooking lessons
yourself.
I have included funding for you to go to your local community house. This wil help you to
pursue the goal in your plan to ‘be able to attend your local community house’.
4.2 Example 2 - Section 34(1)(b) The information you gave us
does not show this support wil help you do things that wil
increase your social and economic participation.
In your request you asked us to include funding for a new microwave so you would be able to
heat up food when your friends visit you. The information we received from your occupational
therapist doesn’t provide us with any evidence you need a microwave because of your
disability. A microwave is considered to be a household item that most people have in their
homes so I have not included funding for this in your plan. You can buy this yourself though if
you would like.
Or You asked to have funding for a personal trainer included in your plan. We did not receive
enough information from your allied health professional telling us you need a personal trainer to
safely participate in exercise classes. I have included funding for group exercise therapy
classes in your plan. This wil help you pursue your goal of meeting new people and improving
your general fitness and mobility. If you would like a personal trainer you could pay for this
yourself.
4.3 Example 3 - Section 34(1)(c) The information you gave us
does not show this support is value for money. This
means there are different supports that are better value for
money because they can give you the same or better
outcomes.
Free text examples for declined supports – 7
Page 69 of 173
FOI 24/25-1942
SGP KP Publishing – Add budget justifications
I have included funding in your plan for a new wheelchair which was recommended in the report
you gave us from your Occupational Therapist (OT).
However, there were some additional features for the wheelchair you asked for that your OT did
not recommend. I have not included funding in your plan for these additional features. If you
would like to buy the wheelchair you requested which has the additional features, you can pay
the difference in cost between them.
Or Following your recent plan check-in I have included weekly hydrotherapy sessions to help you
to improve your mobility. You did ask for funding in your plan for a swimming pool to be put into
your backyard. Unfortunately, I cannot fund a swimming pool as this does not represent value
for money as your occupational therapist has recommended you attend weekly hydrotherapy
sessions.
4.4 Example 4 - Section 34(1)(d) The information you gave us
does not show enough evidence this support is likely to be
effective and beneficial for you. I looked at best practice
and the evidence you provided to make this decision.
You requested that we fund fortnightly massage sessions in your plan as you think this might
help you better manage your mobility.
I have looked at the evidence you provided alongside best practice and cannot find any
supportive evidence that including funding for massage therapy wil assist you in improving your
mobility.
However, I have included funding for physiotherapy sessions in your plan. Your physiotherapist
is going to develop an exercise programme with you to improve your balance and has
suggested you join a local walking group.
4.5 Example 5 - Section 34(1)(e) This support is something it’s
reasonable to expect your informal supports, like family
and friends, to provide.
In Sam’s recent plan check-in you asked us to include funding for a carer to look after him while
you attend a family wedding. Providing care and safe supervision to children is the role of
parents and other family members or informal supports.
As Sam is only 6 years old, I haven’t included funding in his plan for someone else to care for
him while you attend a wedding. Parents would usually arrange supervision for their child if they
were unable to provide care for their child because of work or other commitments.
Free text examples for declined supports – 8
Page 70 of 173
FOI 24/25-1942
SGP KP Publishing – Add budget justifications
I have included funding for speech therapy sessions in Sam’s plan to help him improve his
social skills.
4.6 Example 6 - Section 34(1)(f) This support is something that
another government service is responsible for providing.
At Nishka’s recent plan check-in you asked for funding to be included in her plan to help her to
improve her reading ability. As we discussed, you wil need to talk to Nishka’s school as they
can provide this support for her. Support for Nishka in the classroom is the responsibility of the
Education department. You can ask Niska’s paediatrician to provide evidence and
recommendations to the school to assist her to improve her reading level.
I have included funding for occupational therapy sessions in Niska’s plan to help improve her
fine motor skil s so she can learn to tie her shoelaces by herself.
4.7 Example 7 - Rule 5.1(a) I have not approved this support
because it is likely to cause harm to you or pose a risk to
other people. We need to consider risk of harm for al
supports, such as support workers, therapies or
equipment.
You asked me to include funding in your plan for a walking stick as you are sometimes feeling a
bit unstable when you are accessing the community. The report I have from your occupational
therapist suggest you might be at risk of falls using a walking stick in the community.
Instead, I have included funding in your plan for you to purchase a mobility walking device
which has been recommended by your occupational therapist so you can safely access the
community.
4.8 Example 8 - Rule 5.1(b) I have not approved this support
because the information you gave us doesn’t show this
support addresses your disability support needs. Your
disability support needs are those that arise from, or are
caused by, your disability.
You requested we include funding for house cleaning and garden maintenance in Elanora’s
plan. A 7 year child would not usually be expected to clean the house and look after the garden
and lawns but they might help with some of these jobs. I have not included funding for domestic
Free text examples for declined supports – 9
Page 71 of 173
FOI 24/25-1942
SGP KP Publishing – Add budget justifications
assistance in Elanora’s plan. This request isn’t related to her disability and would not be
expected by someone of her age.
I have included funding in Elanora’s plan for occupational therapy sessions to improve her gross
motor skil s to help her pursue her goal of learning to ride her bike.
4.9 Example 9 - Rule 5.1(c) I have not approved this support
because it would duplicate other supports provided by the
NDIS.
You asked for transport funding to be included in your plan to help you get to work. In your most
recent plan, we paid for your car to be modified so you could drive to work. You confirmed you
are stil able to drive your car which was been modified and was paid for from your plan. I have
not included any funding for transport in this plan as this is a duplication of NDIS funding to
modify your car.
4.10 Example 10 - Rule 5.1(d) I have not approved this support
because it is related to a ‘day-to-day living cost’, such as
groceries, rent or utilities, that are not attributable to your
disability support needs. These are costs that are not
caused by or a result of your disability support needs.
At your recent check in you asked us to include funding to pay for your water bil in your plan.
The cost of water is a day-to-day living cost which everyone has to pay for and is not specific to
your disability. The NDIS can fund reasonable and necessary supports to help you with things
you might not be able to do because of your disability. I have not included funding for your water
bil in your plan, as this is not something the NDIS is able to fund.
4.11 Example 11 - Rule 5.3 (a) I have not approved this support
because it is not legal, either under Australian government
law or under a law that only applies in your state or
territory.
I have including funding in your plan for an electric wheelchair as recommended by your
occupational therapist. This model meets the standards and requirements of the state of
Victoria. The model of wheelchair you requested does not comply with these regulations in
Victoria due to the terrain of the roads in the area you live. Our rules prevent the NDIS from
funding a request for supports if it is against the law of the Commonwealth, State or Territory.
Free text examples for declined supports – 10
Page 72 of 173
DOCUMENT 6
FOI 24/25-1942
Create and submit a home and living
application
SGP KP Publishing
Exported on 2025-05-11 23:32:17
Page 73 of 173
FOI 24/25-1942
SGP KP Publishing – Create and submit a home and living application
Table of Contents
1 Recent updates . . . . . . . . . . . . . . . . . . . . . . . . . . . . . . . . . . . . . . . . . . . . . . . . . . . . . . . . . . 4
2 Before you start . . . . . . . . . . . . . . . . . . . . . . . . . . . . . . . . . . . . . . . . . . . . . . . . . . . . . . . . . . 5
2.1 For a change of circumstances or request for internal review ........................................... 5
2.2 National Access and Reassessment Branch reassessment officers or Reviews Branch
review officers ................................................................................................................................ 5
2.3 For plan reassessments ..................................................................................................... 5
3 Understand when not to create a home and living application . . . . . . . . . . . . . . . . . . . . 6
4 Understand when to create and submit a home and living application . . . . . . . . . . . . . 7
5 Understand evidence to support a home and living application . . . . . . . . . . . . . . . . . . 8
5.1 Understand evidence to support a change to current home and living supports ............... 8
6 Create and submit a home and living application . . . . . . . . . . . . . . . . . . . . . . . . . . . . . . 9
6.1 Create a housing application case ..................................................................................... 9
6.2 Complete the Before you Start information ........................................................................ 9
6.3 Complete the Housing Goal Confirmation information ..................................................... 10
6.4 Complete the Participant's Application Information .......................................................... 10
6.5 Complete the Participant's Care and Support Requirements .......................................... 11
6.6 Complete Additional Information and Supporting Documents information ...................... 11
6.7 Add or link documents ...................................................................................................... 13
6.7.1
Link documents ........................................................................................................................... 13
6.7.2
Add documents ........................................................................................................................... 13
6.8 Submit a home and living application ............................................................................... 13
7 Notify planning the home and living application is complete . . . . . . . . . . . . . . . . . . . . 15
8 Next steps . . . . . . . . . . . . . . . . . . . . . . . . . . . . . . . . . . . . . . . . . . . . . . . . . . . . . . . . . . . . . . 16
Table of Contents – 2
Page 74 of 173
FOI 24/25-1942
SGP KP Publishing – Create and submit a home and living application
This article provides guidance for a planner delegate, review officer, national reassessment
delegate or participant support officer to:
• understand when not to create a home and living application
• understand when to create and submit a home and living application
• understand evidence to support a home and living application
• create and submit a home and living application
• notify planning the home and living application is complete.
Note: on some screens in PACE a home and living application is also called a housing
application.
Recent updates – 3
Page 75 of 173
FOI 24/25-1942
SGP KP Publishing – Create and submit a home and living application
1 Recent updates
3 April 2025
Link to Guide – Behaviour support has been removed, as it's now replaced with guidance in Our
Guideline – Behaviour support.
Recent updates – 4
Page 76 of 173
FOI 24/25-1942
SGP KP Publishing – Create and submit a home and living application
2 Before you start
You have read and understood:
• Requesting home and living supports (external)
• Mandatory Home and Living Referral Criteria on the Home and Living intranet page
• Our Guideline – Individualised living options (external)
• Our Guideline – Behaviour support (external)
• Our Guideline – Specialist Disability Accommodation (external)
• Our Guideline – Short Term Accommodation or Respite (external)
• Our Guideline – Medium term accommodation (external)
• Our Guideline – Supported Independent Living (external)
• Our Guideline – Home modifications (external).
2.1 For a change of circumstances or request for internal
review
• check if the participant needs to change their home and living supports
• check they have submitted a change of details or change of situation form (external) or
• they have requested a review of a home and living outcome.
2.2 National Access and Reassessment Branch reassessment
officers or Reviews Branch review officers
• review either the change of circumstance form or request for internal review form
• create the home and living application when you accept the request.
2.3 For plan reassessments
• talk to the participant and the people who support them about their home and living
situation
• include the participant's home and living goal in their plan.
Before you start – 5
Page 77 of 173
FOI 24/25-1942
SGP KP Publishing – Create and submit a home and living application
3 Understand when not to create a home and living
application
Don't create a home and living application if the participant:
• doesn't meet the mandatory referral criteria for home and living supports
• hasn't given us the correct evidence
• can have their home and living support needs met without a home and living application
• doesn't understand a home and living recommendation we have made. Go to article
Record sending explanation of decision letter in an enquiry case
• requests a recalculation of home and living supports. Go to article Create a plan
reassessment (s48) request.
Understand when not to create a home and living application – 6
Page 78 of 173
FOI 24/25-1942
SGP KP Publishing – Create and submit a home and living application
4 Understand when to create and submit a home and
living application
Before you create a home and living application, talk to the participant about their home and
living options. Learn more about home and living supports (external).
If the participant does want to make a home and living application, they wil need to meet one or
more of the Mandatory Home and Living Referral Criteria. The Mandatory Home and Living
Referral Criteria are on the home and living intranet page.
The home and living intranet page wil help you understand the evidence they need to give us.
You should also look at the article Support a participant requesting home and living supports.
Look at any previous home and living supports and recommendations. This includes any
previous specialist disability accommodation (SDA) amount and recommendation.
To learn more about evidence when requesting home and living supports for the first time and
to change current home and living supports, go to Requesting home and living supports
(external). You wil need to upload supporting evidence to the participant's record.
Understand when to create and submit a home and living application – 7
Page 79 of 173
FOI 24/25-1942
SGP KP Publishing – Create and submit a home and living application
5 Understand evidence to support a home and living
application
Evidence to support an application should be from an allied health professional and be recent
and relevant.
If the participant is requesting home and living supports for the first time, the evidence needs to
explain:
• the participant's daily support and housing needs
• how often and when they need the support each day
• the participant's functional capacity and the impact on their daily life and housing needs
• the other home and living options the participant has explored and why they don't meet
their disability-related support needs.
5.1 Understand evidence to support a change to current home
and living supports
To change the home and living supports already in a participant's plan, the evidence needs to:
• be dated since the last NDIS plan was approved
• explain the significant changes to the participant's daily support and housing needs
• explain any new things the participant can and can't do for themselves
• explain the changes to the participant's functional capacity and the impact on their daily
life and housing needs.
Understand evidence to support a home and living application – 8
Page 80 of 173
FOI 24/25-1942
SGP KP Publishing – Create and submit a home and living application
6 Create and submit a home and living application
When you receive a home and living application from a participant or their authorised
representative, you need to create and submit a housing application case in PACE.
The home and living team wil look at the information you provide in the home and living
application. They'll use this information to make the home and living recommendation.
It's important to provide accurate information and details in the home and living application. This
wil help to avoid delays when we decide on a home and living recommendation for a
participant.
6.1 Create a housing application case
1. From the
Person Account, select
Cases.
Note: for review officers, don't create the case from the
Person Account.
2. From the
Internal Review Case, at the Case Action Bar, select
Housing Application
Case. Then select
Create Case.
3. From the
Cases tab, select
New.
4. At the
New Case screen, select
Housing Application.
5. Select
Next.
6. At
New Case:
Housing Application, use the default settings that have been
prepopulated.
7. Select
Save.
6.2 Complete the Before you Start information
1. Select the
Assessment tab.
2. At
Before you Start, select
Yes at
Is a Home and Living Application required? If
you select
No, you won't be able to continue with the Home and Living Application.
3. Select
Yes at
Notify planning of Home and Living Application? The planner
delegate assigned to the plan approval case wil receive a notification that says Home
and Living application in progress. Please don't work on the plan approval case until the
home and living application is complete. A banner wil also appear on the plan approval
case with the same message.
4. Add key information to the
Application Summary free text field. This provides
important information for the home and living team to consider when they assess the
application. You should include all information about supports the participant is
requesting and what their current supports and living situation looks like.
5. Select
Next.
Note: if you need to change the
Notify Planning selection later, you can edit this in the
Application record. You can open the application from the
Assessment tab in the
Housing Application case.
Create and submit a home and living application – 9
Page 81 of 173
FOI 24/25-1942
SGP KP Publishing – Create and submit a home and living application
6.3 Complete the Housing Goal Confirmation information
At
Housing Goal Confirmation:
1. Select
Yes or
No at
Does the participant have an urgent housing need? For
example, select
Yes if the participant is at risk of homelessness or losing the support of
a parent due to them entering age care.
2. Select
Yes or
No at
To meet their housing goal, does the participant need to
relocate?
3. Select
Yes or
No at
Can the participant remain in their current home? For example,
the participant wants to remain living in their own home but needs an increase of
support.
4. Select
Next.
6.4 Complete the Participant's Application Information
To avoid any issues with the application, make sure you consider al questions carefully. Only
select the options relevant to the participant's situation. We use this information to decide the
outcome of the application.
At
Participant's Application Information:
1. Select
Yes or
No at
Has the participant's current living situation and future needs
been discussed and recorded in CRM? Note: in SAP CRM look at interactions or
planning notes to find this information. In PACE check the plan conversation support
tool or the
Details tab.
2. Select
Yes or
No at
Is the participant automatical y eligible for SDA due to their
living status when they transitioned into NDIS?
3. Select
Yes or
No at
Has the participant been previously assessed for SDA by the
Panel?
Note: this can also be called a complex assessment meeting (CAM). To find this in
PACE look at the
Decision tab and the
Housing tab. You can also check the inbound
documents and interactions in SAP CRM for a home and living outcome.
o If
Yes, go to steps 4 and 5.
o If
No, go to step 6.
4. At
Current SDA amount add the funding amount in the free text field. You can find the
current SDA funding amount in the approved plan details. Please make sure you use
the SDA calculator to apply indexation.
5. At
Current SDA decision add relevant recommendation details in the free text field.
For example, add why the recommendation was approved or denied.
6. At
What is the reason for submitting this application? select the relevant option.
o If The participant is currently in hospital, soon to be discharged is selected, go
to step 7.
o If The participant is currently in a justice facility, soon to be released is selected,
go to step 7.
Create and submit a home and living application – 10
Page 82 of 173
FOI 24/25-1942
SGP KP Publishing – Create and submit a home and living application
o If no option or any of the other relevant options are selected, go to step 8.
7. At
What is the participant's discharge status? select the relevant option.
Note: a release plan from the justice facility or a discharge letter wil be provided by the
participant. The discharge letter wil provide relevant information to help you understand
their hospital discharge status. For example, the discharge date. You can check
inbound documents in SAP CRM or
Documents in PACE for this letter.
8. At
Which Home and Living Support/s would the participant like to be considered
for in this application? select the relevant options.
9. At
What are the participant's preferred living arrangements? select the relevant
option.
10. At
What is the participant's preferred home location? select the location area from
the drop-down options.
Ask the participant where they would like to live. The participant can tell you a location
that's different to their current home. It's important to get this information right as it could
change the home and living amount. For example, the SDA amount.
11. Select
Next.
6.5 Complete the Participant's Care and Support Requirements
Note: if you select
Yes in the below steps, you must provide supporting documents. For
example, assessments, reports or other documents. These must clearly show how they relate to
the statements in this section of the application.
Use the information from the participant's functional capacity assessment or positive behaviour
support plan. They wil help you to select the relevant options.
At
Participant's Care and Support Requirements:
1. At
Mobility, select
Yes or
No for each statement.
2. At
Self care, select
Yes or
No for each statement.
3. At
Social interaction / Community access, select
Yes or
No for each statement.
4. At
Communication, select
Yes or
No for each statement.
5. At
Self management, select
Yes or
No for each statement.
6. At
Behaviours of Concern, select
Yes or
No for each statement.
7. Select
Next.
6.6 Complete Additional Information and Supporting
Documents information
At
Additional Information and Supporting Documents:
1. Select the relevant option from the drop-down at
TAB advice.
Create and submit a home and living application – 11
Page 83 of 173
FOI 24/25-1942
SGP KP Publishing – Create and submit a home and living application
o If you're waiting on or have received advice from Technical Advice and Practice
Improvement Branch (TAPIB), select the option that reflects the status.
o If you're not waiting on TAPIB advice, select
None.
2. At
Wil this application require or likely require Delegation Level 5 plan approval
(Annualised plan value greater than $1M)? select
Yes or
No.
Look at the previous approved plan and note the amount that was approved. Add the
approved funding with the new supports, to determine if the value wil be greater than
$1M. If the plan is for over one year, remember to calculate per year, not the whole plan
amount.
3. At
Is the participant identified in CRM (or in PACE)
as a current CSN participant?
select
Yes or
No. Select
Yes if they're assigned to a complex planner.
Note: this step is for participants transferring from SAP CRM to PACE.
4. At
Is there a reason for prioritisation? select the relevant option from the drop-down.
Consider if there's a reason for prioritisation:
o If
Yes, select the option that reflects the reason for the prioritisation. Go to step
5.
o If
No, select None. Go to step 6.
5. At
Prioritisation Comment, record reasons why the application should be prioritised.
For example, the participant is at risk of losing the support of an informal carer.
6. At
Application Source, select the relevant option. This wil record the pathway the
application was received from.
o If Accepted Change of Circumstances (s48) is selected, go to step 7.
o If Accepted Review of Reviewable Decision (s100) is selected, go to step 7.
o If Agency Initiated Plan Review (AIPR) is selected, go to step 8.
o If Scheduled Plan Review is selected, go to step 8.
7. Complete the
Review Request Date. Enter the:
o Review Request date day (DD)
o Review Request date month (MM)
o Review request date year (YYYY).
8. At
Required Supporting Evidence, input all relevant information in the free text field.
Include a list of the evidence documents you wil upload and the reason they were
requested.
Note: the following supporting evidence is needed for this application:
o Functional Capacity Assessment. Learn more in article Understand functional
capacity assessments.
o Positive Behaviour Support Plan. Learn more in Our Guideline – Behaviour
support (external).
Create and submit a home and living application – 12
Page 84 of 173
FOI 24/25-1942
SGP KP Publishing – Create and submit a home and living application
6.7 Add or link documents
To add or link supporting evidence for this application:
• go to
Link documents if they've already been uploaded to a person account
• go to
Add documents if they aren't on the person account.
6.7.1 Link documents
1. Select
Link Documents.
2. Select the checkbox next to the
Document Name you want to link to the home and
living case.
3. Select
Link. Check the document you want to link to the case is correct.
4. Select
Close.
5. Select
Finish when you have linked all the relevant documents.
6.7.2 Add documents
1. Select
Add Documents.
2. Select the relevant option from the
Please select a Document Category drop-down.
3. Select the relevant option from the
Please select a Document SubCategory drop-
down.
4. Select the relevant option from the
Does the document contain any Personal
identifiable information (PII)? drop-down.
5. At
Description, add information about the document you're uploading.
6. Select
Next.
7. Select
Upload Files. Select the relevant file from the saved documents in your personal
computer (PC).
8. Select
Open.
9. Select
Save.
10. Select
Close to return to the case.
6.8 Submit a home and living application
1. At
Additional Information and Supporting Documents review the housing
application. Make sure the information is correct. Check all relevant evidence or
documents are uploaded.
2. Select the
Details tab.
3. In the
Additional Information section, add key information to the
Description free text
field. The Home and Living team wil consider this information to decide the supports
the participant needs and the escalation priority. Include a summary of:
o the home and living supports the participant is requesting
o the participant's current supports
Create and submit a home and living application – 13
Page 85 of 173
FOI 24/25-1942
SGP KP Publishing – Create and submit a home and living application
o the participant's current living situation for example, discharging from hospital,
breakdown of critical supports.
4. The
Prioritisation Comment and
Prioritisation Reason wil automatically populate
here when you submit the case, if you entered this information in the
Additional
Information and Supporting Documents step.
5. Select the
Assessment tab.
6. Select
Submit.
Application submitted will display. Select
Done.
Note: for review officers, assign the
Housing Application case to yourself and
continue with the review. Use article View and update a home and living application.
Create and submit a home and living application – 14
Page 86 of 173
FOI 24/25-1942
SGP KP Publishing – Create and submit a home and living application
7 Notify planning the home and living application is
complete
Once you select
Notify Planning, the
Draft Budget tab in the
Plan Approval case will show a
banner. The banner wil say
The participant has a home and living application in progress.
Please don't work on the plan approval case until the home and living application is
complete.
When the home and living application is completed, the banner wil automatically be removed.
You can remove the banner manually in an active housing application without notifying
planning. For example, if the planner delegate doesn't need to know about the outcome. Then
follow these steps:
1. Open the
Housing Application case.
2. From the
Details tab, deselect the
Notify Planning checkbox.
3. Select
Save.
A notification wil also be sent to the plan approval case owner that says
Home and Living
application is complete. Please review before proceeding with a plan approval case.
Notify planning the home and living application is complete – 15
Page 87 of 173
FOI 24/25-1942
SGP KP Publishing – Create and submit a home and living application
8 Next steps
For information on how to view a home and living application or recommendation, go to article
View and update a home and living application.
Next steps – 16
Page 88 of 173
 OFFICIAL
DOCUMENT 7
OFFICIAL
DOCUMENT 7
FOI 24/25-1942
Knowledge Article
For Internal Use Only
The contents of this document are OFFICIAL.
View and update a home and living application
Guidance in this document is not approved for use unless you view it in PACE.
This article provides guidance for a planner delegate, internal review delegate and participant
support officer to:
• understand notification of a home and living application on a plan approval case
• view a home and living application
• view the progress of the home and living application
• view an in-progress home and living application
• view the home and living recommendation
• explain the recommendation to the participant
• update the application status to completed (planner delegate only).
Recent updates
18 March 2024
We have updated this guidance to explain how you can send an SMS to the participant before
you make a phone cal , to let them know you’l call from a private number.
4 March 2024
We have updated guidance to include a link to the Requesting home and living supports page
on the NDIS website. This information wil help participants understand what they need to do
and the correct evidence they’l need to give us when they ask for home and living supports for
now and in the future.
Before you start
You have read and understood:
• Requesting home and living supports (external)
• article How to support a participant requesting home and living supports
You have either:
V5.0 2024-03-07 View and update a home and living application 310739571
Page 1 of 9
This document is uncontrolled when printed
OFFICIAL
Page 89 of 173
 OF
OF
FOI
FICIAL
24/25-1942
Knowledge Article
For Internal Use Only
• created a home and living application in PACE. To learn more, go to article Create
and submit a home and living application
• received notification of a home and living recommendation
• received an enquiry from a participant about their home and living application
• checked the participant’s housing and accommodation information in the
Housing
tab and
Details tab in PACE.
Note: A home and living application is referred to as a Housing Application on some screens in
PACE.
Note: If a participant has moved from SAP CRM to PACE, check inbound documents in SAP
CRM for uploaded evidence documents.
Understand notification of a home and living application
on a plan approval case
Housing Application case in progress
When a
Housing Application case is in progress, the plan approval case owner wil receive a
Home and Living notification:
1. A red circle with a white number inside wil appear in the
Notification (bell).
2. Select the
Notification (bell). The notification wil say
Home and Living application in
progress. Please don’t work on the plan approval case until the home and living is
complete.
You wil also be able to view that a home and living application is in progress by checking the
plan approval case in the participant’s person account:
From the
Person Account.
1. Select
Cases.
2. From the participant’s
Open Cases, select the
Plan Approval case.
3. The
Draft Budget tab wil open. You wil see a red banner that says
Home and living
application case is currently open. The participant has a home and living
application in progress. Please don’t work on the plan approval case until the
home and living application is complete.
View a home and living application
V5.0 2024-03-07 View and update a home and living application 310739571
Page 2 of 9
This document is uncontrolled when printed
OFFICIAL
Page 90 of 173
 OF
OF
FOI
FICIAL
24/25-1942
Knowledge Article
For Internal Use Only
From the
Person Account:
1. Select
Cases.
2. Find the
Housing Application by scrolling through the participant’s
Case Record Type.
3. Select the
Housing Application. The
Housing Application screen wil appear.
View the progress of the home and living application
Home and living application chevrons
Chevrons show the home and living application status:
•
Draft: the application is in draft and is not in progress yet.
•
New: an application is created and is waiting to be assessed.
•
Under Assessment: the application is being assessed.
•
Requested further info: there is insufficient information to make a
recommendation. Further information is requested from the participant.
•
Decision: a recommendation has been made from the housing application.
•
Awaiting Build: the recommendation is awaiting build in the participant’s plan.
•
Plan Build RFI: The plan builder has requested information to help with the plan
build.
•
Closed Status: There are five Closed Status options as below.
Closed status options:
•
Completed – a decision has been made. Changes to the participant’s plan are
complete.
•
Completed – decision with delegate for build – a recommendation has been
made and assigned to a planner delegate to include supports in the participant’s
plan. This status is used by the Service Delivery Support.
•
Cancelled – the housing application has been cancelled.
•
Rejected – the housing application has been rejected.
•
Completed – a plan build is not required at this time – a recommendation has
been made. There is no change to the participant’s plan.
V5.0 2024-03-07 View and update a home and living application 310739571
Page 3 of 9
This document is uncontrolled when printed
OFFICIAL
Page 91 of 173
 OF
OF
FOI
FICIAL
24/25-1942
Knowledge Article
For Internal Use Only
Reason why there is no status change to the participant’s plan:
• They are currently unable to move to a new location. For example, they are in
hospital and not ready for discharge.
• They have asked us not to include supports in their plan until they find suitable
accommodation.
• Specialist advice is pending. For example, from the Technical Advice and Practice
Improvement Branch.
• There is delay moving to a new location for other reasons. For example, due to
mental health concerns.
• The home and living supports need to be endorsed at EL1 level or above.
From the
Housing Application screen:
1. View the chevrons to check the application status.
2. After you have noted the application status, decide if you need to view the progress of
the application or view the recommendation:
• If the status is
New,
Under Assessment or
Requested further info, go to
View an
in-progress home and living application in this article.
• If the status is
Decision,
Rejected or
Closed, go to
View the home and living
recommendation in this article.
View an in-progress home and living application
You can find more information about the participant’s application status in several locations:
•
Details – information about the participant’s application. Select the links to these
documents in this tab.
•
Activity log – files, notes, and meeting information.
•
Case History – a summary of the actions completed on this case.
•
Risk Level – shows if the application is complex or low risk. The Complex
Assessment Meeting delegates wil make recommendations for complex
applications. The Home and Living Operations team wil make recommendations on
low-risk applications.
V5.0 2024-03-07 View and update a home and living application 310739571
Page 4 of 9
This document is uncontrolled when printed
OFFICIAL
Page 92 of 173
 OF
OF
FOI
FICIAL
24/25-1942
Knowledge Article
For Internal Use Only
•
Case Owner – shows what team or individual is managing the application (if
assigned).
•
Most recent activity – provides overview on recent activity completed on the
application.
•
Parent Case – (Panel Meeting) shows details of the panel assigned, and date of the
panel meeting.
1. Review information about the home and living application progress.
2. Provide the participant with the information you locate on the status of their application.
Note: You should not contact the case owner to request an update.
3. Record your conversation in an activity log. To learn more, go to article Log an activity
or internal note.
View the home and living recommendation
Housing Application case is complete
If
Notify Planning? was selected in the
Housing Application case, once it has been
completed the plan approval case owner wil receive a
Home and Living notification:
1. A red circle with a white number inside wil appear in the
Notification (bell).
2. Select the
Notification (bell). The notification wil say
Home and Living application is
complete. Please review before proceeding with a plan approval case.
To review the home and living application recommendation, from the
Person Account:
1. Select the
Cases tab.
2. From the participant’s
Open Cases, select the
Housing Application case.
3. The
Assessment screen wil open.
From the
Assessment screen:
1. In
Applications, select the
Application Name to view the details of the application.
2. Select
Decision. In the
Eligibility Decision section, review the
Is Eligible for SDA
(Specialist Disability Accommodation) and
Decision Justification fields.
3. At
Is Eligible for SDA:
• If
Yes, go to Step
4 • If
No or
Not Applicable, go to Step
5.
V5.0 2024-03-07 View and update a home and living application 310739571
Page 5 of 9
This document is uncontrolled when printed
OFFICIAL
Page 93 of 173
 OF
OF
FOI
FICIAL
24/25-1942
Knowledge Article
For Internal Use Only
4. At
SDA Criteria Levels note the SDA information for the participant, including the
Max
Price Per Resident. This is the maximum SDA amount per year. Go to article Add
specialist disability accommodation (SDA) funding.
5. Check the
Alternative Support Decision for additional supports to consider when
developing the participant’s plan.
Explain the recommendation to the participant
1. Locate the letter in the
Decision Outcomes Document:
• in
Inbound Documents of the participant's SAP CRM record, if the participant is still
in transition.
• in
Documents or
Case activity in PACE.
2. Check the details, including the
Decision Justification.
3. Contact the participant or authorised representative by their preferred contact method to
discuss the home and living outcome. Go to article Check a person’s preferred contact
method.
Note: If contacting by phone, before you call you can send an SMS to let the participant
know you’re going to call them from a private number. To learn more, go to article Send
an SMS in PACE.
4. Introduce yourself and explain the purpose of the call. If they are contacted by the NDIA,
it wil show as a private number. The person calling wil identify themself and explain
they are cal ing from the NDIA. The participant can confirm the call is legitimate by
contacting the National Contact Centre (NCC) on 1800 800 110.
In your conversation explain:
• the home and living application recommendation
• justification for the recommendation
• details of the SDA approved, including SDA type, design category, location and
building type
• the maximum price per resident to be included in the participant’s plan
• other home and living supports included in the recommendation.
5. If you are not the delegate who needs to update the case status, log an activity to record
your conversation with the participant. Go to article Log an activity or internal note. Once
the conversation is recorded, there are no further actions.
V5.0 2024-03-07 View and update a home and living application 310739571
Page 6 of 9
This document is uncontrolled when printed
OFFICIAL
Page 94 of 173
 OF
OF
FOI
FICIAL
24/25-1942
Knowledge Article
For Internal Use Only
Update the application status to completed (planner
delegate only)
Only planner delegates with edit access in PACE can complete these steps.
From the
Case:
1. Select
Log a Call.
2. In the
Comments field, record brief details:
• provide the date you contacted the participant
• include the type of contact. For example, by phone or email
• provide the date you recorded the interaction in the activity log
• include a summary of any other information discussed with the participant, if
applicable.
3. Select
Save.
4. Select
Mark Status as Completed. By selecting
Completed you are stating that
Completed – build not required at this time or
Completed – decision with delegate
for build.
5. Select the status from the
Status options in the
Close this Case window.
6. Select
Save.
7. Locate the
Home and Living Decision in the
Decision tab or the
Home and Living
Decision Outcomes letter in
Documents.
8. From the
Activity Panel, select
Log Activity and record details of your conversation
with the participant advising the outcome.
9. Change the interaction
Status to
Completed.
Next steps
• Supports included in the home and living recommendation should be included in the
participant’s plan.
• For more information, go to articles Add individualised living options (ILO) Stage 1
Exploration and Design, Add individualised living options (ILO) Stage 2: Supports
funding, Add medium term accommodation (MTA) funding and
Add supported
independent living (SIL) funding.
V5.0 2024-03-07 View and update a home and living application 310739571
Page 7 of 9
This document is uncontrolled when printed
OFFICIAL
Page 95 of 173
 OF
OF
FOI
FICIAL
24/25-1942
Knowledge Article
For Internal Use Only
2.6
JNL620
Addressed EL1 feedback
DRAFT
2024-02-20
2.7
DD0014
EL1 review
DRAFT
2024-02-22
Class 1 update – link to home and
2.8
REB563
DRAFT
2024-02-27
living webpage added
2.9
REB563
Action Director comment
DRAFT
2024-02-28
3.0
ED0024
Class 1 approval.
APPROVED 2024-02-28
SMS content removed. Not going
3.1
REB563
DRAFT
2024-02-29
ahead
4.0
ED0024
Class 1 approval
APPROVED 2024-02-29
Reinstating previous draft content
for SMS following approval -
Updated section Explain the
4.1
REB563
DRAFT
2024-03-05
decision to the participant, step 3
with reference to KA Send an SMS
to the participant.
Update to terminology actioned –
4.2
REB563
replacing ‘decision’ with
DRAFT
2024-03-06
‘recommendation’ or ‘outcome’
4.3
KK0027
AD review
DRAFT
2024-03-06
4.4
ED0024
Director review
DRAFT
2024-03-07
4.5
ADO206
Action director review
DRAFT
2024-03-07
5.0
ED0024
Director Class 1 approval
APPROVAL 2024-03-07
V5.0 2024-03-07 View and update a home and living application 310739571
Page 9 of 9
This document is uncontrolled when printed
OFFICIAL
Page 97 of 173
DOCUMENT 8
FOI 24/25-1942
Add or remove in-kind supports
SGP KP Publishing
Exported on 2025-05-11 23:56:45
Page 98 of 173
FOI 24/25-1942
SGP KP Publishing – Add or remove in-kind supports
Table of Contents
1 Recent updates . . . . . . . . . . . . . . . . . . . . . . . . . . . . . . . . . . . . . . . . . . . . . . . . . . . . . . . . . . 4
2 Before you start . . . . . . . . . . . . . . . . . . . . . . . . . . . . . . . . . . . . . . . . . . . . . . . . . . . . . . . . . . 5
3 Use the In-Kind Report . . . . . . . . . . . . . . . . . . . . . . . . . . . . . . . . . . . . . . . . . . . . . . . . . . . . 6
3.1 Access the In-Kind Report .................................................................................................. 6
4 Add in-kind supports . . . . . . . . . . . . . . . . . . . . . . . . . . . . . . . . . . . . . . . . . . . . . . . . . . . . . . 8
5 Remove in-kind supports . . . . . . . . . . . . . . . . . . . . . . . . . . . . . . . . . . . . . . . . . . . . . . . . . . 9
6 Next steps . . . . . . . . . . . . . . . . . . . . . . . . . . . . . . . . . . . . . . . . . . . . . . . . . . . . . . . . . . . . . . 11
Table of Contents – 2
Page 99 of 173
FOI 24/25-1942
SGP KP Publishing – Add or remove in-kind supports
This article provides guidance for a planner delegate, local area coordinator or early childhood
partner to:
• use the In-Kind Report
• add in-kind supports
• remove in-kind supports.
Recent updates – 3
Page 100 of 173
FOI 24/25-1942
SGP KP Publishing – Add or remove in-kind supports
1 Recent updates
24 February 2025
Guidance updated to:
• replace links with new articles Change the draft budget and Action a budget update
• update information on phasing out current in-kind supports and operation
• update language in-line with legislation updates.
Recent updates – 4
Page 101 of 173
FOI 24/25-1942
SGP KP Publishing – Add or remove in-kind supports
2 Before you start
You've read and understood:
• article Guide – In-kind
• the In-kind intranet page
• article Change the draft budget
• article Action a budget update
• Our Guideline – Reasonable and necessary supports (external)
• Our Guideline – Changing your plan (external).
Before you start – 5
Page 102 of 173
FOI 24/25-1942
SGP KP Publishing – Add or remove in-kind supports
3 Use the In-Kind Report
It's important to check if the participant is receiving in-kind supports. You'll need to consider
these supports as part of the NDIS funding criteria when you review the participant's NDIS
supports.
The In-Kind Report in PANDA Live provides information about participants who currently access
in-kind supports. It also includes details of the supports they receive. The Commonwealth, state
and territory governments regularly update the In-Kind Report to reflect current participant and
program information. You should check the report at each plan change. You'll need to check for
any changes and identify if any in-kind supports were included in the participant's previous plan.
When you talk to the participant, use the information in the In-Kind Report to confirm they
receive supports from an in-kind program. The In-Kind Report allows you to search for a
participant and wil help you understand what in-kind programs they currently receive.
Since 1 July 2024, there are three in-kind programs stil operating:
• Personal Care in Schools (all of Australia)
• School Transport Programs (all of Australia)
• Staffed Residential Services (Western Australia only)
To learn more about in-kind programs and when they're due to phase out, go to the In-kind
intranet page.
After the in-kind programs phase out, participants wil use their NDIS plan funding to pay for
their NDIS supports. This is just like any of their other NDIS supports.
You can identify the participant's in-kind program from PANDA Live – In-Kind Report. You'll then
use this information to add or review these supports in the participant's NDIS plan in PACE.
3.1 Access the In-Kind Report
You can access the In-Kind Report from the NDIS reporting platform PANDA Live.
Access to the In-Kind Report is available to all staff and partners who have access to PANDA
Live.
To identify if a participant is accessing in-kind supports:
1. From the NDIS Intranet home page, select the
NDIS PANDA and PANDA Live link.
2. Select
Open PANDA Live.
3. Select
Report Catalogue.
4. Under
Filter Results, select the
PLATFORM drop-down menu, then select
PANDA
Live.
5. Under
Browse Reports, select
In-Kind Listing and then select
VIEW REPORT.
Note: the In-Kind Report contains a large volume of data. Please allow time for the
Use the In-Kind Report – 6
Page 103 of 173
FOI 24/25-1942
SGP KP Publishing – Add or remove in-kind supports
report to display.
6. When the
In-Kind Report details display, enter the participant's name or NDIS number
in the
REFINE RESULTS search bar. The In-Kind Report wil search automatically.
These tips may help your search:
o The search bar isn't case sensitive.
o You can search for the participant's details using either their NDIS number, first
name, first and last name or last name.
o For the most effective results, search by the participant's full name or NDIS
number.
o Al fields containing the search criteria wil display in the search result. For
example, searching for 'VIC' wil display all participants with state 'VIC' and
participants with 'VIC' in their name.
o The search result defaults to all service providers, all programs and all states
and territories. To refine your search, select the specific Service Provider,
Program or State or Territory from the drop-down option for each category.
7. The participant's in-kind support items identified by state or territory wil display.
8. If the participant receives multiple supports items from the in-kind program, or receives
support from many in-kind programs, these wil display on several rows.
9. Note the participant's in-kind support details, including the state or territory, support type
and in-kind program name. You'll need this information to update their information in
PACE.
Use the In-Kind Report – 7
Page 104 of 173
FOI 24/25-1942
SGP KP Publishing – Add or remove in-kind supports
4 Add in-kind supports
Before you add in-kind supports to a participant's plan:
• review the In-Kind Report for the participant's in-kind information
• determine the phase out date for the in-kind program in the participant's state or
territory. For more information go to In-kind intranet page
• create a
Plan-Change case. Use article Prepare to submit a plan change request.
In-kind support categories wil sit alongside each funded support category, except for recurring
transport. For example,
Assistance with Daily Life- In-Kind. They're listed in a participant's
NDIS plan to show a level of funding. This is to help with the transition away from in-kind
supports. The key principles for in-kind are:
• no claims can be made against these budgets
• no providers can be paid against these budgets.
You can use a
Plan Change case,
Participant Budget Update case or
Plan Approval case to
add an in-kind support to an existing plan. The steps wil differ depending on the case you're in.
For:
•
Plan Change case or
Participant Budget Update, go to article Action a budget
update. Follow the steps in section
Add a new support category
•
Plan Approval case, go to article Change the draft budget. Follow the steps in section
Add a support category.
Note: make sure funding for the support isn't duplicated. For example, funding generated in the
typical support package (TSP) and added as in-kind.
In-kind supports must be Agency-managed because they've been pre-paid. In the
Support
Category Fund Management Settings, the default for
Budget Type will be
Stated. In
Fund
Management Type, this field wil be locked to
In-Kind.
The Commonwealth and each state or territory wil notify the NDIA when an in-kind program
arrangement ends. The participant can then choose to continue with a registered NDIS
provider. Or they can explore options to engage a plan manager or self-manage the support.
Add in-kind supports – 8
Page 105 of 173
FOI 24/25-1942
SGP KP Publishing – Add or remove in-kind supports
5 Remove in-kind supports
A participant can request to stop using their in-kind provider at any time. If the participant
requests to stop using an in-kind service provider during their plan, please email
s22(1)(a)(ii) - irrelevant material for support.
If the participant can stop using their in-kind provider, you must identify how to include the in-
kind supports in their plan. This is to make sure the participant can stil access the supports they
need.
If the participant needs to continue using their existing in-kind provider, you must notify the
participant or their authorised representative of the decision. Explain why the in-kind provider is
considered the most effective and efficient provider for the supports. Record this information
and any other details of your conversation. The participant can request a review of their plan at
any time, this includes in-kind supports or in-kind providers specified in their plan.
To learn more about recording your discussions with the participant, go to article Log an activity
or internal note.
You can remove a support category when the evidence shows the support:
• doesn't meet NDIS funding criteria
• isn't needed by the participant. This may include Capital supports that were funded in
previous plans
• needs to be recorded as in-kind, direct commissioning or periodic support.
You'll need to understand:
• if the in-kind support end date is on or before the program phase out date, no action is
needed. The in-kind support wil be end-dated automatically
• if the in-kind support end date is after the program phase out date, you need to remove
the in-kind support. This occurs on the date the in-kind support program phased out.
You must identify and add a new support category to make sure the participant
continues to receive these supports in their plan.
In these situations, create a
Plan Change case to remove the in-kind support from the
participant's current plan. Go to article Prepare to submit a plan change request.
You can remove in-kind supports from a
Participant Budget Update,
Plan Change or
Plan
Approval case. The steps wil differ depending on the case you're in.
For:
•
Participant Budget Update or
Plan Change case, go to article Action a budget
update. Follow the steps in section
Add a new support category
•
Plan Approval case, go to article Change the draft budget. Follow the steps in section
Add a support category.
Remove in-kind supports – 9
Page 106 of 173
FOI 24/25-1942
SGP KP Publishing – Add or remove in-kind supports
Record your reason for removing the support category in the
Handover Notes tab. To learn
more, go to article Add handover notes for a plan approval case. If you've declined a participant
requested support, you need to record a declined support. To learn more, go to article Record a
declined support.
Remove in-kind supports – 10
Page 107 of 173
FOI 24/25-1942
SGP KP Publishing – Add or remove in-kind supports
6 Next steps
If you're in the
Plan Approval case, record this information in the
Plan meeting notes. To learn
how to complete plan meeting notes, go to article Add plan meeting notes.
Next steps – 11
Page 108 of 173
DOCUMENT 9
FOI 24/25-1942
Action a budget update
SGP KP Publishing
Exported on 2025-05-11 23:49:57
Page 109 of 173
FOI 24/25-1942SGP KP Publishing – Action a budget update
Table of Contents
1 Recent updates . . . . . . . . . . . . . . . . . . . . . . . . . . . . . . . . . . . . . . . . . . . . . . . . . . . . . . . . . . 4
2 Before you start . . . . . . . . . . . . . . . . . . . . . . . . . . . . . . . . . . . . . . . . . . . . . . . . . . . . . . . . . . 5
3 Confirm the case for completing a budget update as part of a s47A decision . . . . . . . 6
4 Check for external review orders during a budget update . . . . . . . . . . . . . . . . . . . . . . . 7
5 Request further information . . . . . . . . . . . . . . . . . . . . . . . . . . . . . . . . . . . . . . . . . . . . . . . . 8
6 Contact the participant or authorised representative . . . . . . . . . . . . . . . . . . . . . . . . . . . 9
7 Update the reassessment date . . . . . . . . . . . . . . . . . . . . . . . . . . . . . . . . . . . . . . . . . . . . . 10
8 Add support categories to the budget update . . . . . . . . . . . . . . . . . . . . . . . . . . . . . . . . 11
9 Change the instalment type of an existing support category . . . . . . . . . . . . . . . . . . . . 12
10
Adjust a support category . . . . . . . . . . . . . . . . . . . . . . . . . . . . . . . . . . . . . . . . . . . . . . . 13
10.1
Select support items and check plan comments .......................................................... 14
10.2
Review and submit ........................................................................................................ 14
11
Add a new support category . . . . . . . . . . . . . . . . . . . . . . . . . . . . . . . . . . . . . . . . . . . . . 15
11.1
Select support items and check plan comments .......................................................... 16
11.2
Review and submit ........................................................................................................ 16
12
Remove a support category from the approved plan . . . . . . . . . . . . . . . . . . . . . . . . . 17
13
Remove draft budget items . . . . . . . . . . . . . . . . . . . . . . . . . . . . . . . . . . . . . . . . . . . . . . 18
14
Add the plan conversation support tool to the case . . . . . . . . . . . . . . . . . . . . . . . . . 19
15
Next steps . . . . . . . . . . . . . . . . . . . . . . . . . . . . . . . . . . . . . . . . . . . . . . . . . . . . . . . . . . . . 20
Table of Contents – 2
Page 110 of 173
FOI 24/25-1942SGP KP Publishing – Action a budget update
This article provides guidance for a planner delegate, planner (non-partnered area) or review
officer to:
• confirm the case for completing a budget update as part of a s47A decision
• check for external review orders during a budget update
• request further information
• contact the participant or authorised representative
• update the reassessment date
• add support categories to the budget update
• change the instalment type of an existing support category
• adjust a support category
• add a new support category
• remove a support category from the approved plan
• remove draft budget items
• add the plan conversation support tool to the case.
Recent updates – 3
Page 111 of 173
FOI 24/25-1942SGP KP Publishing – Action a budget update
1 Recent updates
6 November 2024
New section added to upload the Plan Conversation Support Tool (PCST) to the case after the
draft budget has been developed.
4 November 2024
Guidance updated to highlight a Participant Budget Update case should not be cancelled.
14 October 2024
Guidance updated to reflect legislation to start a new body called the Administrative Review
Tribunal (ART). The ART replaced the Administrative Appeals Tribunal (AAT) on Monday 14
October 2024. Updates include:
• Administrative Appeals Tribunal (AAT) changed to Administrative Review Tribunal
(ART) or external review where needed to cover both AAT and ART.
4 October 2024
Guidance updated to remove calculations when completing a budget update and instead link to
the Plan Conversation Support Tool (PCST). The PCST can be used to help generate the
increase or decrease amount when completing a budget update.
Recent updates – 4
Page 112 of 173
FOI 24/25-1942SGP KP Publishing – Action a budget update
2 Before you start
You have:
• read and understood Our Guideline – Reasonable and necessary supports (external)
• read and understood Our Guideline – Changing your plan (external)
• read and understood article Understand milestones in a case
• reviewed the plan change request, go to article Assign and review a plan change case
• made a decision to vary a plan change request, go to article Make a plan change
decision.
Before you start – 5
Page 113 of 173
FOI 24/25-1942SGP KP Publishing – Action a budget update
3 Confirm the case for completing a budget update as
part of a s47A decision
When you update the participant's budget outside of a plan variation (s47A) decision, go to
section
Check for external review orders during a budget update in this article.
When there's a decision to vary the participant's plan (s47A) in a Plan Change case, PACE wil
trigger the Budget Updates and Fund Management tabs to appear in the Plan Change case.
PACE wil also create a Participant Budget Update (PBU) case as a standalone case.
For s47A decisions, don't use the participant budget update case. Make sure you complete all
actions via the Budget Updates and Fund Management tabs within the Plan Change case.
Once the updated plan tab has been approved and the plan change case has been completed,
the PBU case wil also update to completed.
Note: Don't select the
Cancel Case button in the participant budget update case. This case wil
need to remain open to allow the updates to be made in the
Plan change case.
Confirm the case for completing a budget update as part of a s47A decision – 6
Page 114 of 173
FOI 24/25-1942SGP KP Publishing – Action a budget update
4 Check for external review orders during a budget
update
Check for any current (in effect) or previous external review orders, decisions, or notices. Also
check if there's an Administrative Review Tribunal (ART) application in progress.
If an ART application is in progress, there'll be an
Alert on the
Person Account. You can also
check for any previous external review orders and decisions on the
Documents tab of the
Person Account.
Note: On Monday 14 October the Administrative Review Tribunal (ART) replaced the
Administrative Appeals Tribunal (AAT). The term AAT wil stil show in PACE alerts after
Monday 14 October.
To check for external review orders, decisions, or notices:
1. In the
Person Account, select the
Documents tab.
2. Select the
Category heading to sort documents alphabetically. Look for any documents
with the
Authorisation category. You can also sort by the
Sub Category heading and
look for a document with the
Legal Orders sub category.
3. Once you've located the external review related document, select the document from
the list.
4. Select
Download from the
Document Details pop-up screen.
5. A copy of the document wil be downloaded to your personal files to view.
You need to consider any external review orders or decisions when you are varying and
approving a participant's plan. You need to make sure the effect of those orders or decision is
preserved where appropriate and stil required.
Note: You shouldn't make any changes to plan supports related to an external review order or
decision stil in effect. The order or decision wil usually state the length of time it applies for.
You must consider any active external review order or decision as part of the evidence you use
to make your plan variation decision. If there's no evidence to suggest changes to a support that
was based on an external review order or decision, these are generally kept in the next plan.
You should check:
• if the decision or order has a specific time period the support wil be in place for
• if the decision or order relates to a particular life stage or transition
• if there's evidence the participant's situation has changed and the intent of the support
no longer applies.
You'll need to justify any changes to supports included in a plan by an external review order.
You should check with a senior planner or team leader if you need help to understand an
external review order, decision or notice. You can seek help with more complicated cases
through the ART Case Management Branch by emailing s22(1)(a)(ii) - irrelevant material.
Check for external review orders during a budget update – 7
Page 115 of 173
FOI 24/25-1942SGP KP Publishing – Action a budget update
5 Request further information
If you have enough information or evidence, complete the budget update. If you don't have
enough information or evidence, create a request for more information.
For all requests for information, you'll need to contact the participant or their authorised
representative. Learn more in article Contact attempts and unable to contact in a plan change
case.
Note: If the requested information is related to evidence, you'll need to link this to the
Plan
Change or
Participant Budget Update case. Go to article Add and link evidence to a case.
Request further information – 8
Page 116 of 173
FOI 24/25-1942SGP KP Publishing – Action a budget update
6 Contact the participant or authorised representative
Each plan variation (s47A) must be prepared with the participant or authorised representative.
To help you build rapport and have authentic and engaging conversations, go to article Guide –
Conversation style guide.
Before you make any changes to the participant's plan you must make every attempt to contact
them. Learn more in article Contact attempts and unable to contact in a plan change case.
You'll need to:
• discuss what supports you'll vary
• explain if the supports are flexible or stated, what budget category you're varying, and
how the funding can be used
• discuss the new plan reassessment date, if applicable
• advise of requests that haven't been changed in the plan and reason for this decision, if
applicable
• recommend they contact their Local Area Coordinator (LAC) or Coordinator of Supports
as to how they can use their plan flexibly, if applicable
• explain their review rights if they disagree with the decision
• go to article Create and action a request for a replacement support if they request a
replacement support.
Note: The participant can ask for an internal review of the plan variation decision within 3
months from the decision letter. Learn more in article Our Guideline – Reviewing our decisions
(external).
In July 2024 we updated the plan letter and supports to include comments that help the
participant understand how to use their plan. We're now updating our computer system for new
legislative changes. Until these changes are finalised, make sure you have advised the
participant that their plan letter and plan wil look similar. You'll need to explain:
• the total funded supports budget and support types haven't changed
• their NDIS plan wil have comments explaining the type of NDIS supports included in
their plan
• these comments wil help the participant better understand what NDIS supports they
can buy with their plan
• there's information on how to protect their NDIS plan from fraud.
Contact the participant or authorised representative – 9
Page 117 of 173
FOI 24/25-1942SGP KP Publishing – Action a budget update
7 Update the reassessment date
If you need to change the reassessment date in a participant budget update, go to article
Update the reassessment date in a participant budget update.
Note: When updating the reassessment date, all supports in the current approved plan wil
come into the budget update. Al support category funded amounts wil be automatically
adjusted to the new reassessment date.
These support categories don't need any further update unless it's needed as part of the
request. Go to section
Adjust a support category or
Next Steps in this article.
Update the reassessment date – 10
Page 118 of 173
FOI 24/25-1942SGP KP Publishing – Action a budget update
8 Add support categories to the budget update
In a
Participant Budget Update case, only add supports if they need to change. Al other
supports in the participant's plan won't change when the budget update is approved.
If you want to include supports from a participant's current plan in the budget update:
1. In the
Plan Change or
Participant Budget Update case, select the
Budget Updates
tab.
2. Select the button
Select Existing Support Categories.
3. Select the
Add to Budget Update checkbox next to each support you'd like to include
in the budget update.
4. Select
Next.
Add support categories to the budget update – 11
Page 119 of 173
FOI 24/25-1942SGP KP Publishing – Action a budget update
9 Change the instalment type of an existing support
category
If you're not changing the instalment type of a support category, go to section
Adjust a support
category in this article.
If you change the instalment type of an existing support category, it can cause problems with
the frequency and amount calculations. This wil cause errors in the budget update.
If you need to change the instalment type of a support category already included in a plan and
need to:
• remove the existing support category with the incorrect instalment type. Go to section
Remove a support category from the approved plan in this article.
• add the same support category with the required instalment type. Go to section
Add a
new support category in this article.
Note: The new instalment type must be different to the instalment type of the removed support
category. You'll get an error if you replace the same support category and instalment type.
Change the instalment type of an existing support category – 12
Page 120 of 173
FOI 24/25-1942SGP KP Publishing – Action a budget update
10 Adjust a support category
You'll need to adjust each support you've added to the budget update.
Note: Supports that are
Pending Update are mandatory to complete before you can approve
the budget update.
1. From either the
Flexible Budget or
Stated Budget, select the budget item with the
action
Pending Update.
2. Review the
Budget Type and update if needed.
3. Select either
Increase Amount or
Decrease Amount.
Note: If you're completing a plan variation:
o you can't backdate supports. You can only include supports from the date the
plan variation wil take effect.
o only decrease funded supports where there's a minor or technical error. For
example, moving funding from a support category added in error to a new
category added as part of the budget update. If major changes are needed,
complete changes as part of a plan reassessment (s48).
o and you're decreasing the funded amount to $0 for a support that's not a Core
support category, remove the support category from the participant's plan. Go
to section
Remove a support category from the approved plan in this article.
o make sure you don't decrease the funding amount below the amount that has
already been paid for the support category. This wil create a negative balance
in the participant record. You may need to confirm this with the participant or
authorised representative if they've used funding that hasn't been claimed.
You'll need to think about this when reducing funding.
o Talk to your team leader or senior planner if you think you need to decrease
funding as part of a plan variation.
4. Enter the adjusted
Amount for this support. You can use the Plan Conversation
Support Tool (PCST) to develop the
Increase or
Decrease Amount. To learn more, go
to section
Complete the budget update in article Understand and update the plan
conversation support tool.
Note: The adjustment is based on the
Instalment Type field. If the
Instalment Type is:
o
Recurring, the adjustment wil be to the
annual amount.
o
Regular, the adjustment wil be to the
monthly amount.
o
Once-off, the adjustment wil be to the
total amount.
5. If the support meets all of the NDIS funding criteria under the
Justifications heading,
select the checkbox to confirm this.
6. Record
Justification in the free text field. For some supports, this might automatically
populate. You can edit the justification to make it specific to the participant's support
needs. For more information about recording justifications, go to article Add budget
justifications.
Note: This field has a limit of 3000 characters. Certain special characters in this field
may cause an error, this is generally caused when copying justifications from SAP CRM
into PACE. If you see the characters |% you'll need to change these before you can
select save.
7. If you're using evidence to support your justification, select the
Evidence Used
checkbox.
8. Select the
Evidence Type from the drop-down list:
o If you select
Document, go to step 10.
o If you select
Other, go to step 11.
Adjust a support category – 13
Page 121 of 173
FOI 24/25-1942SGP KP Publishing – Action a budget update
9. Enter the
Evidence Link. To bring up a list of evidence that's linked to the case, press
the spacebar. Select the correct evidence document to link to the decision. You can
view linked evidence on the
Evidence tab of the
Plan Change or
Participant Budget
Update case. To learn more about linking evidence, go to article Add and link evidence
to a case.
10. Enter the
Evidence Explanation into the free text field.
11. If you need to add more evidence to support your justification, select the checkbox
Add
further evidence links and repeat from step 7.
12. Select
Next.
10.1 Select support items and check plan comments
Plan comments wil print on the participant's plan. You'll need to select which support items
you're funding under each support category.
1. Check the plan comments for each support item in the support category. Go to article
Understand and check plan comments.
Note: Support items cannot be added when there's no funding in a support category.
Please add funding to the support category if you want to identify support items. If you
add a $0 support category for flexibility of Core supports, you don't have to add support
item. You'll receive an error message if you select
Yes to any support item.
2. Select
Next.
10.2 Review and submit
1. On the
Review and Submit screen, you'll be able to view the
Base Description and
the
Plan Comments for the support category.
Note: The support category
Base Description and
Plan Comments will print to the
participant's plan. The
Base Description cannot be edited.
2. Review the support category plan comments.
o Check that comments are objective, include facts based on evidence, and
avoid personal opinions or feelings.
o Keep the text short, simple and in plain conversational English.
o Check your spelling and grammar.
o Avoid jargon.
o Introduce all acronyms before using them. For example, 'Assistive Technology
(AT)'.
o Avoid the use of special characters, such as < > or % as this wil cause an error
or the comment to appear blank.
3. Once you've confirmed the base description and plan comments are correct, select the
acknowledgement checkbox to confirm this.
4. Select
Submit. If you need to add another support return to section
Adjust a support
category in this article.
Adjust a support category – 14
Page 122 of 173
FOI 24/25-1942SGP KP Publishing – Action a budget update
11 Add a new support category
If you're adding
Recurring transport support category, make sure you check if the participant
or authorised representative has an active bank account recorded. If there's no bank account
recorded, you can't add this until after you've approved the budget update.
To view bank account details, go to article View bank account details. If you need to update the
bank account details, go to articles Before you update bank account details and Add, update or
remove bank account details.
You can use the Plan Conversation Support Tool (PCST) to understand the amount of supports,
go to article Understand and update the plan conversation support tool. If you use the PCST,
you
must attach it to the participant record.
To add a new item to the draft budget:
1. From the
Budget Updates tab, select
Add New Budget Item.
2. Enter the support name into the
Support Category field.
3. Select the
Budget Type from the drop-down list.
4. Select the
Instalment Type.
If the Instalment Type is:
o
Recurring, the
Amount wil be the
annual amount for this support.
o
Regular, the
Amount wil be the
monthly amount for this support.
o
Once-off, the
Amount wil be the
total amount for this support.
5. Enter the
Amount of this support. Use the Plan Conversation Support Tool (PCST) to
develop the Increase or Decrease Amounts. To learn more, go to section
Complete the
budget update in article Understand and update the plan conversation support tool.
6. If the support meets all of the NDIS funding criteria under the
Justifications heading,
select the checkbox to confirm this.
7. Record
Justification in the free text field. For some supports, this might automatically
populate. You can edit the justification to make it specific to the participant's support
needs. For more information about recording justifications, Go to article Add budget
justifications.
Note: This field has a limit of 3000 characters. Certain special characters in this field
may cause an error, this is generally caused when copying justifications from SAP CRM
into PACE. If you see the characters |% you'll need to change these before you can
select save.
8. If you're using evidence to support your justification, select the
Evidence Used
checkbox.
9. Select the
Evidence Type from the drop-down list:
o If you select
Document, go to step 10.
o If you select
Other, go to step 11.
10. Enter the
Evidence Link. To bring up a list of evidence that's linked to the case, press
the spacebar. Select the correct evidence document to link to the decision. You can
view linked evidence on the
Evidence tab of the
Plan Change or
Participant Budget
Update case. To learn more about linking evidence, go to article Add and link evidence
to a case.
11. Enter the
Evidence Explanation into the free text field.
12. If you need to add more evidence to support your justification, select the checkbox
Add
further evidence links and repeat from step 9.
Add a new support category – 15
Page 123 of 173
FOI 24/25-1942SGP KP Publishing – Action a budget update
13. Select
Next.
11.1 Select support items and check plan comments
Plan comments wil print on the participant's plan. You'll need to select which support items
you're funding under each support category.
1. Check the plan comments for each support item in the support category. Go to article
Understand and check plan comments.
Note: Support items cannot be added when there's no funding in a support category.
Please add funding to the support category if you want to identify support items. If you
add a $0 support category for flexibility of Core supports, you don't have to add support
item. You'll receive an error message if you select
Yes to any support item.
2. Select
Next.
11.2 Review and submit
1. On the
Review and Submit screen, you'll be able to view the
Base Description and
the
Plan Comments for the support category.
Note: The support category
Base Description and
Plan Comments will print to the
participant's plan. The
Base Description cannot be edited.
2. Review the support category plan comments. You'll need to make sure to:
o Check that comments are objective, include facts based on evidence, and
avoid personal opinions or feelings.
o Keep the text short, simple and in plain conversational English.
o Check your spelling and grammar.
o Avoid jargon.
o Introduce all acronyms before using them. For example, 'Assistive Technology
(AT)'.
o Avoid the use of special characters, such as < > or % as this wil cause an error
or the comment to appear blank.
3. Once you've confirmed the base description and plan comments are correct, select the
acknowledgement checkbox to confirm this.
4. Select
Submit. If you need to add another support, return to section
Add a new
support category in this article.
Add a new support category – 16
Page 124 of 173
FOI 24/25-1942SGP KP Publishing – Action a budget update
12 Remove a support category from the approved plan
If you're completing a plan variation (s47A), only remove a support category in limited
circumstances where there's a minor or technical error. For example, funding moved from a
support category added in error to a new category added in the budget update.
If you've identified the participant doesn't need a support, or if by adding a new support it wil
impact existing supports in the plan, you should consider completing a s48 plan reassessment.
Talk to your team leader or senior planner if you think you need to remove a support as part of a
variation.
If the budget has any once-off
Capital funded supports, such as assistive technology or home
modifications, do not remove these during a budget update. These items wil be removed from
the budget during a plan reassessment. This includes if the item has been added in error.
You can remove a support category when the evidence shows the support:
• was added in error
• has a minor or technical error in the amount of funding in the plan
• is not wanted by the participant and has been added in error
• needs to be recorded as in-kind, direct commissioning or periodic support.
You
won't be able to remove
Core flexible supports. If NDIS funding criteria isn't met, record
$0.00 in the
Amount for this support. This wil make sure that
Core supports can continue to be
flexible.
If you've removed a support category to record it as in-kind, direct commissioning or periodic
support, go to article Add or remove in-kind supports.
If you need to remove a support from a participant's approved plan:
1. On the
Budget Updates tab, select
Remove Support Categories.
2. Review the list of support categories and select the checkbox
Remove From Plan
under the support category you're removing from the plan.
3. At the
Justification drop-down list, select the relevant option.
4. At the
Sub-Justification drop-down list, select the relevant option.
5. Add
Additional Details about why you are removing this support in the free text field.
Note: This wil not display on a participant's plan. Use this comment to discuss funded
supports as part of a plan implementation meeting.
6. Select
Continue.
7. On the
Budget Updates tab, the
Support Category wil appear under either the
Flexible Budget or
Stated Budget heading with an
Action of
Remove.
Remove a support category from the approved plan – 17
Page 125 of 173
FOI 24/25-1942SGP KP Publishing – Action a budget update
13 Remove draft budget items
If an item has been added in error or has incorrect details, you'll need to delete the draft budget
item.
1. From the
Budget Updates tab, select the budget item under the
Flexible Budget or
Stated Budget headings.
2. In the
Budget Item Update screen, select
Remove Support From Budget.
3. Select
Yes to confirm you want to remove the support category.
4. Select
Save.
5. Record your reason for removing the support category by adding an internal note. Go to
article Log an activity or internal note.
Remove draft budget items – 18
Page 126 of 173
FOI 24/25-1942SGP KP Publishing – Action a budget update
14 Add the plan conversation support tool to the case
Once you've made changes to the draft budget in PACE and are ready to progress to the next
step, you must upload a copy of the plan conversation support tool (PCST). This wil act as a
record of how the draft budget was developed.
The PCST must be added as a complete excel workbook. Saving a single excel worksheet or
as a PDF wil not allow a budget breakdown to be produced if it's requested. Make sure you're
adding the complete PCST to the person account.
1. From the
Plan Change or
Participant Budget Update case, select the
Documents
tab.
2. Select
Add Documents. The
Documents Details pop-up window wil appear.
3. At
Please select a Document Category, select
Supporting Information.
4. At
Please select a Document SubCategory, select
General.
5. At
Does the document contain any Personal identifiable information (PI )?, select
No.
Note: Please make sure you're on the correct person account before adding a
document.
6. Provide any further information in the
Description free text field.
7. Select
Next.
8. Select
Upload Files.
9. Find and
Open the file to upload. Al documents in the table should be
Ready for
upload.
10. Select
Save. Al files should now show as
Uploaded successfully.
Note: If a document fails to upload, select
Retry.
11. Select
Close. The Documents tab wil now show the document that was uploaded to
the case.
Note: When you've uploaded the document, confirmed it's in PACE and can open correctly, you
must immediately delete al saved copies of the document to protect participant privacy.
If you need to delete a document, go to article Delete a document from PACE.
Add the plan conversation support tool to the case – 19
Page 127 of 173
FOI 24/25-1942SGP KP Publishing – Action a budget update
15 Next steps
1. Check the fund management decision and update if needed. Go to article Make fund
management decision.
2. Approve the budget update using article Finalise and approve a budget update.
Next steps – 20
Page 128 of 173
DOCUMENT 10
FOI 24/25-1942
Change plan duration
SGP KP Publishing
Exported on 2025-05-11 23:54:58
Page 129 of 173
FOI 24/25-1942SGP KP Publishing – Change plan duration
Table of Contents
1 Recent updates . . . . . . . . . . . . . . . . . . . . . . . . . . . . . . . . . . . . . . . . . . . . . . . . . . . . . . . . . . 4
2 Before you start . . . . . . . . . . . . . . . . . . . . . . . . . . . . . . . . . . . . . . . . . . . . . . . . . . . . . . . . . . 5
3 Change plan duration . . . . . . . . . . . . . . . . . . . . . . . . . . . . . . . . . . . . . . . . . . . . . . . . . . . . . 6
4 Plans less than 12 months in duration . . . . . . . . . . . . . . . . . . . . . . . . . . . . . . . . . . . . . . . 7
5 Next Steps . . . . . . . . . . . . . . . . . . . . . . . . . . . . . . . . . . . . . . . . . . . . . . . . . . . . . . . . . . . . . . . 8
Table of Contents – 2
Page 130 of 173
FOI 24/25-1942SGP KP Publishing – Change plan duration
This article provides guidance for a planner delegate, planner (non-partnered area), external
review officer or a compensation delegate to change plan duration.
Recent updates – 3
Page 131 of 173
FOI 24/25-1942SGP KP Publishing – Change plan duration
1 Recent updates
3 April 2025
Compensation added to justification options for less than 12 months plan duration.
Recent updates – 4
Page 132 of 173
FOI 24/25-1942SGP KP Publishing – Change plan duration
2 Before you start
You've read and understood:
• Our Guideline – Creating your plan (external)
• Our Guideline – Changing your plan (external).
Before you start – 5
Page 133 of 173
FOI 24/25-1942SGP KP Publishing – Change plan duration
3 Change plan duration
Al plans including first plans, scheduled and unscheduled reassessments,
must be 12 months
(1 year) or less until PACE is updated to enable funding periods. The funding period wil be
applied to the Total Funding Amount of the participant's plan and wil be the same length as the
plan duration until PACE is updated.
Note: This includes plans that are assessed as meeting streamlined planning high confidence
criteria.
If this is the participant's first plan, PACE wil automatically set the plan for 12 months. If the
plan already has a 12-month duration, continue reading from
Next steps in this article.
For plans with less than 12 months duration, go to section
Plans less than 12 months in
duration in this article.
For plans with more than 12 months duration, in the
Plan Approval case:
1. Select the
Draft Budget tab.
2. Select
Change Plan Duration.
3. Select
Plan Duration Years and
Plan Duration Months.
4. At
Justification, select
Participant's first plan from the drop-down list.
Note: Until PACE is updated to include funding periods, you'll have to select this option
for all plans.
5. Add your justification in the
Additional Details. Explain why you've selected a
particular plan duration. Article Add budget justifications provides guidance on why we
record justifications and free text guidelines.
Note: As part of your justification you'll need to note a 1 year plan duration was
selected due to current system limitations and requirements for plan duration to equal
the funding period for this plan.
6. Select
Save.
7. When you make plan duration changes, PACE wil automatically:
8. update support category budgets with regular instalments
9. change the plan reassessment date, which wil print on the participant's plan.
Note: If the participant has a
Recurring Transport support category, you need to
change the support category budget amount.
Change plan duration – 6
Page 134 of 173
FOI 24/25-1942SGP KP Publishing – Change plan duration
4 Plans less than 12 months in duration
There wil be limited situations where you'll need to reduce the plan duration for less than 12
months. This includes Administrative Review Tribunal (ART) orders and transition back to
compensation statutory schemes.
This is for plans between 1 month and 11 months in duration.
These steps are for a plan reassessment. For steps to reduce the plan duration as part of a plan
variation, go to article Update the reassessment date in a participant budget update.
In the
Plan Approval case:
1. Select the
Draft Budget tab.
2. Select
Change Plan Duration.
3. Select
Plan Duration Years and
Plan Duration Months.
Note: The new reassessment date must be at least 1 month after the last plan approval
date. You'll receive an error if the date is less than one month from the last approval
date.
4. At
Justifications drop-down list, if you're reducing the plan duration based on:
o an ART order, select
Plan duration set based on AAT order o the participant transitioning back to a compensation statutory scheme, select
Compensation.
5. Enter
Additional Details about your justification in the free text field.
6. Select
Save.
Plans less than 12 months in duration – 7
Page 135 of 173
FOI 24/25-1942SGP KP Publishing – Change plan duration
5 Next Steps
1. If you need to continue adding supports to the budget, go to article Change the draft
budget.
2. If you're ready to progress to a plan meeting, go to article Book and prepare for the plan
meeting.
Next Steps – 8
Page 136 of 173
DOCUMENT 11
FOI 24/25-1942
Use the specialist disability
accommodation (SDA) calculator
SGP KP Publishing
Exported on 2025-05-11 23:59:20
Page 137 of 173
FOI 24/25-1942
SGP KP Publishing – Use the specialist disability accommodation (SDA) calculator
Table of Contents
1 Recent updates . . . . . . . . . . . . . . . . . . . . . . . . . . . . . . . . . . . . . . . . . . . . . . . . . . . . . . . . . . 4
2 Before you start . . . . . . . . . . . . . . . . . . . . . . . . . . . . . . . . . . . . . . . . . . . . . . . . . . . . . . . . . . 5
3 Understand changes to SDA prices . . . . . . . . . . . . . . . . . . . . . . . . . . . . . . . . . . . . . . . . . . 6
4 Use the SDA price calculator for the participant's recommended SDA amount . . . . . . 7
5 Use the SDA price calculator for the enrolled dwel ing SDA amount . . . . . . . . . . . . . . 8
6 Confirm the SDA amount to include in the participant's plan . . . . . . . . . . . . . . . . . . . . . 9
7 Next steps . . . . . . . . . . . . . . . . . . . . . . . . . . . . . . . . . . . . . . . . . . . . . . . . . . . . . . . . . . . . . . 10
Table of Contents – 2
Page 138 of 173
FOI 24/25-1942
SGP KP Publishing – Use the specialist disability accommodation (SDA) calculator
This article provides guidance for a review officer, participant support officer, payments officer,
planner delegate, planner (non-partnered area), and national reassessment delegate
to:
• understand changes to SDA prices
• use the SDA price calculator for the participant's recommended SDA amount
• use the SDA price calculator for the enrolled dwelling SDA amount
• confirm the SDA amount to include in the participant's plan.
Recent updates – 3
Page 139 of 173
FOI 24/25-1942
SGP KP Publishing – Use the specialist disability accommodation (SDA) calculator
1 Recent updates
29 July 2024
Updated guidance to remove some sections and direct link to NDIS SDA Price Calculator excel
file. Replaced with SDA pricing and payments NDIS website containing up-to-date calculator.
Recent updates – 4
Page 140 of 173
FOI 24/25-1942
SGP KP Publishing – Use the specialist disability accommodation (SDA) calculator
2 Before you start
You have read and understood:
• Our Guideline – Specialist Disability Accommodation (external)
• SDA pricing and payments (external)
• article Support categories
• article Change the draft budget
• article Apply the home and living decision in PACE.
You have:
• confirmed the participant has a completed housing application recommending SDA
supports. You can find this in the
Decision tab of the most recent Housing Application
case.
Note: If there is no recommendation of SDA supports but SDA supports are in the
current SAP CRM plan, go to article Include specialist disability accommodation (SDA)
funding for participants with no assessed SDA amount
• confirmed the participant's address is an enrolled SDA dwelling. To learn more, go to
article Check the specialist disability accommodation (SDA) enrolled dwelling details
• checked the enrolled dwelling details include up-to-date pricing. Use the NDIS SDA
Price Calculator from SDA pricing and payments (external) to confirm current prices.
Compare this with the maximum price per resident value. To help, use the information
in the participant's
SDA Enrolment
• discussed with the participant any risks involved, if they have decided to move into a
different SDA building category than they were recommended for. For example, if the
participant was recommended for being eligible for a high physical supports SDA and
has chosen to move into improved liveability. You have discussed and made the
participant aware of the differences between these dwellings. To learn more, go to the
Specialist Disability Accommodation (SDA) Design Standard (PDF 8.39MB)
• checked all SDA amounts using the current NDIS SDA Price Calculator from SDA
pricing and payments (external). This is before including the SDA funding in the
participant's plan. This is to make sure you use the correct pricing for the current
financial year.
Before you start – 5
Page 141 of 173
FOI 24/25-1942
SGP KP Publishing – Use the specialist disability accommodation (SDA) calculator
3 Understand changes to SDA prices
The SDA calculator was developed to help get the correct SDA amount when the price changes
each year. The current calculator can be found on SDA pricing and payments (external).
The Australian Taxation Of ice (ATO) has recently ruled that exemption from goods and
services tax (GST) only applies to certain types of NDIS providers (external).
Understand changes to SDA prices – 6
Page 142 of 173
FOI 24/25-1942
SGP KP Publishing – Use the specialist disability accommodation (SDA) calculator
4 Use the SDA price calculator for the participant's
recommended SDA amount
Use the NDIS SDA Price Calculator from SDA pricing and payments (external) to record the
following details and work out the participant's assessed SDA amount:
1. At
Dwel ing enrolled as, select
Post-2023 New Build from the drop-down. You'll need
to select this to check if the participant needs the SDA maximum amount.
2. At
Building type, select the building type from the drop-down. Use the information in
the participant's SDA recommendation to select the building type.
3. At
Design Category, select from the drop-down. Use the information in the participant's
SDA recommendation to select the building category.
4. At
With or without On-site Overnight Assistance (OOA), select
With OOA from the
drop-down.
5. At
With or without Fire Sprinklers, select
With Fire Sprinklers from the drop-down.
6. At
Were input Tax Credits claimed for the GST paid on purchase cost of the
dwel ing?, select
Input Tax Credits were not claimed. You will always select this for
participant recommended SDA amount.
7. At
Location (SA4), if the participant has:
o not yet moved into an SDA enrolled dwelling, select the location the participant
is eligible for, as determined by their SDA recommendation
o moved into an SDA enrolled dwelling, select the location of the SDA enrolled
dwelling. To learn more, go to article Check the specialist disability
accommodation (SDA) enrolled dwelling details.
8. At
Location Adjusted Annual SDA Amount, review the
Calculated value.
9. Record this as the
Participant assessed SDA amount.
Use the SDA price calculator for the participant's recommended SDA amount – 7
Page 143 of 173
FOI 24/25-1942
SGP KP Publishing – Use the specialist disability accommodation (SDA) calculator
5 Use the SDA price calculator for the enrol ed
dwel ing SDA amount
To work out the participant's enrolled dwelling SDA amount, you wil :
• search the participant's confirmed SDA address on
SDA Enrolment and SDA enrolled
dwelling details, using article Check the specialist disability accommodation (SDA)
enrolled dwelling details. The SDA enrolled dwelling price recorded in
SDA Enrolment
should match the current financial year pricing
• use the NDIS SDA Price Calculator from SDA pricing and payments (external) to record
the following details and work out the enrolled dwelling SDA amount.
1. At
Dwel ing enrolled as, select the relevant SDA type from the drop-down. You can
find this information in the
SDA Enrolment details.
For example,
Existing stock, Legacy stock, Pre-2023 New build (first enrolled as a
new build before 1 July 2023) or
Post-2023 New Build (first enrolled as a new build on
or after 1 July 2023).
2. At
Building type, select from the drop-down, to match what is recorded in the
SDA
Enrolment details.
3. At
Design Category, select from the drop-down, to match what is recorded in the
SDA
Enrolment details.
4. At
With or without On-site Overnight Assistance (OOA), select
With or without
OOA from the drop-down, to match what is recorded in the
SDA Enrolment details.
5. At
With or without Fire Sprinklers, select
With or without fire sprinklers from the
drop-down, to match what is recorded in the
SDA Enrolment details.
6. At
Were input tax credits claimed for the GST paid on purchase cost of the
dwel ing?, select from the drop-down options to match what is recorded in the
SDA
Enrolment details.
7. At
Location (SA4), select the location to match what the SDA enrolled dwelling is
recorded as in PACE.
8. At
Location Adjusted Annual SDA Amount, review the
Calculated value.
9. Confirm this is the same as what is recorded as the maximum price per resident yearly.
If the maximum price per resident yearly amount shows a different value, contact
s22(1)(a)(ii) - irrelevant material to update this record.
Use the SDA price calculator for the enrol ed dwelling SDA amount – 8
Page 144 of 173
FOI 24/25-1942
SGP KP Publishing – Use the specialist disability accommodation (SDA) calculator
6 Confirm the SDA amount to include in the
participant's plan
1. Check the participant recommendation for SDA amount and SDA enrolled dwelling
amount.
2. If the amounts are different, add the lesser of the two amounts to the SDA support
category in the plan.
o
Example 1: If the participant SDA recommendation amount is lower than the
enrolled dwelling amount, use the lesser participant assessed amount.
o
Example 2: If the enrolled dwelling amount is lower than the participant SDA
recommended amount, use the lesser enrolled dwelling amount.
Confirm the SDA amount to include in the participant's plan – 9
Page 145 of 173
FOI 24/25-1942
SGP KP Publishing – Use the specialist disability accommodation (SDA) calculator
7 Next steps
• To create and submit a home and living application, go to article Create and submit a
home and living application.
• To add SDA funding into the participant's plan, go to article Add specialist disability
accommodation (SDA) funding.
Next steps – 10
Page 146 of 173
DOCUMENT 12
FOI 24/25-1942
Include specialist disability
accommodation (SDA) funding for
participants with no assessed SDA
amount
SGP KP Publishing
Exported on 2025-05-12 00:02:38
Page 147 of 173
FOI 24/25-1942
SGP KP Publishing – Include specialist disability accommodation (SDA) funding for participants with no
assessed SDA amount
Table of Contents
1 Recent updates . . . . . . . . . . . . . . . . . . . . . . . . . . . . . . . . . . . . . . . . . . . . . . . . . . . . . . . . . . 4
2 Before you start . . . . . . . . . . . . . . . . . . . . . . . . . . . . . . . . . . . . . . . . . . . . . . . . . . . . . . . . . . 5
3 Understand SDA funding for participants with no assessed SDA amount . . . . . . . . . . 6
4 Consider when to include SDA funding for participants with no assessed SDA
amount . . . . . . . . . . . . . . . . . . . . . . . . . . . . . . . . . . . . . . . . . . . . . . . . . . . . . . . . . . . . . . . . . . . . . 7
5 Next steps . . . . . . . . . . . . . . . . . . . . . . . . . . . . . . . . . . . . . . . . . . . . . . . . . . . . . . . . . . . . . . . 8
Table of Contents – 2
Page 148 of 173
FOI 24/25-1942
SGP KP Publishing – Include specialist disability accommodation (SDA) funding for participants with no
assessed SDA amount
This article provides guidance for an
internal review delegate, participant support officer,
payments officer, planner delegate, partner (non-partnered area), national reassessment
delegate to:
• understand SDA funding for participants with no assessed SDA amount.
• consider when to include SDA funding for participants with no assessed SDA amount.
Recent updates – 3
Page 149 of 173
FOI 24/25-1942
SGP KP Publishing – Include specialist disability accommodation (SDA) funding for participants with no
assessed SDA amount
1 Recent updates
22 December 2023 New article to help you understand how to include specialist disability accommodation (SDA)
funding for participants with no assessed SDA amount.
Recent updates – 4
Page 150 of 173
FOI 24/25-1942
SGP KP Publishing – Include specialist disability accommodation (SDA) funding for participants with no
assessed SDA amount
2 Before you start
You have read and understood:
• Our Guideline – Specialist Disability Accommodation (external)
• article Guide – Identify home and living solutions.
You have:
• reviewed the participant record on SAP CRM.
• identified the SDA line item has been included in the participant’s current plan.
• reviewed the participant’s housing application and determined there is no SDA eligibility
decision completed.
• reviewed
Inbound docs in SAP CRM and confirmed there is no SDA panel decision
completed.
Before you start – 5
Page 151 of 173
FOI 24/25-1942
SGP KP Publishing – Include specialist disability accommodation (SDA) funding for participants with no
assessed SDA amount
3 Understand SDA funding for participants with no
assessed SDA amount
Some participants may have SDA funding included in their plan, but the participant hasn’t been
assessed for SDA under a home and living or SDA panel decision. This has caused
inconsistency when transitioning plans from SAP CRM to PACE. This is due to the requirement
to input a dollar amount in the Specialist Disability Accommodation (SDA) support category.
There may be specific reasons why participants have SDA funding included in their SAP CRM
plan without a home and living or SDA panel decision. These include:
• the participant is living in an enrolled dwelling
• the participant is not currently living in an enrolled dwel ing.
Understand SDA funding for participants with no assessed SDA amount – 6
Page 152 of 173
FOI 24/25-1942
SGP KP Publishing – Include specialist disability accommodation (SDA) funding for participants with no
assessed SDA amount
4 Consider when to include SDA funding for
participants with no assessed SDA amount
The participant is living in an enrolled dwel ing This guidance wil help you understand and consider when to include SDA funding. This is for
participants who are currently living in an SDA enrolled dwelling with no home and living or SDA
panel decision.
If a participant was living in SDA when they became a participant, the NDIA recognise they wil
stil be eligible under the bilateral agreement.
This is for participants stil living in the same SDA that they were living in when they transitioned
to the NDIS. We wil continue to include the amount of the SDA enrolled dwelling in their PACE
plan. To learn more, go to article Check the specialist disability accommodation (SDA) enrolled
dwelling details.
Note: If the participant was living in SDA when they became a participant and moved from that
SDA, they are stil eligible. The participant would need a home and living decision to work out
the SDA amount that would meet their disability-related needs. To learn more, go to article
Create and submit a home and living application.
The participant is not currently living in an SDA enrolled dwel ing This guidance wil help you understand and consider when to include SDA funding. This is for
participants who are not currently living in an SDA enrolled dwelling and have no home and
living or SDA panel decision.
You wil apply reasonable and necessary decision-making to remove the SDA funding from the
PACE plan. This is if the participant has SDA funding included in their SAP CRM plan but have
never lived in an enrolled SDA dwelling. For example, the dwelling is not currently, or has never
been an enrolled SDA dwelling. We don’t consider these participants to be SDA-eligible under
Transitional Arrangements.
Note: Please make sure you talk to the participant (or their authorised representative) and if
applicable, inform the accommodation provider before removing SDA. For example, the
supported independent living (SIL) provider. We want to make sure there is a mutual
understanding that there is:
• no current need for SDA
• no pre-existing eligibility for SDA.
If a participant has the SDA funding included in their SAP CRM plan, you’l need to complete a
home and living application. This is to determine the SDA assessed amount for the participant,
if:
• they were living in an enrolled SDA property when they became a participant
• the legacy SDA dwelling is no longer enrolled.
Consider when to include SDA funding for participants with no assessed SDA amount – 7
Page 153 of 173
FOI 24/25-1942
SGP KP Publishing – Include specialist disability accommodation (SDA) funding for participants with no
assessed SDA amount
5 Next steps
• To create and submit a home and living application, go to article Create and submit a
home and living application.
• To add SDA funding into a participant’s PACE plan, go to article Add specialist disability
accommodation (SDA) funding.
Next steps – 8
Page 154 of 173
DOCUMENT 13
FOI 24/25-1942
Check the specialist disability
accommodation (SDA) enrolled
dwelling details
SGP KP Publishing
Exported on 2025-05-12 00:04:45
Page 155 of 173
FOI 24/25-1942
SGP KP Publishing – Check the specialist disability accommodation (SDA) enrolled dwelling details
Table of Contents
1 Recent updates . . . . . . . . . . . . . . . . . . . . . . . . . . . . . . . . . . . . . . . . . . . . . . . . . . . . . . . . . . 4
2 Before you start . . . . . . . . . . . . . . . . . . . . . . . . . . . . . . . . . . . . . . . . . . . . . . . . . . . . . . . . . . 5
3 Check if a specialist disability accommodation (SDA) dwel ing is enrolled . . . . . . . . . 6
4 View the enrol ed dwel ing details . . . . . . . . . . . . . . . . . . . . . . . . . . . . . . . . . . . . . . . . . . . 7
5 Next steps . . . . . . . . . . . . . . . . . . . . . . . . . . . . . . . . . . . . . . . . . . . . . . . . . . . . . . . . . . . . . . . 8
Table of Contents – 2
Page 156 of 173
FOI 24/25-1942
SGP KP Publishing – Check the specialist disability accommodation (SDA) enrolled dwelling details
This article provides guidance for a planner delegate to:
• check if a specialist disability accommodation (SDA) dwelling is enrolled
• view the enrol ed dwelling details.
Recent updates – 3
Page 157 of 173
FOI 24/25-1942
SGP KP Publishing – Check the specialist disability accommodation (SDA) enrolled dwelling details
1 Recent updates
4 March 2024 We have updated guidance to include:
• what to do if you cannot find the SDA dwelling in the SDA Enrolment Assets list
• the Max Price per Resident Yearly when developing a participant’s plan.
Recent updates – 4
Page 158 of 173
FOI 24/25-1942
SGP KP Publishing – Check the specialist disability accommodation (SDA) enrolled dwelling details
2 Before you start
You have:
• reason to check if a participant’s address is SDA enrolled. For example, you need to
check the most recent information, including any changes to the dwelling amount,
before adding SDA funding to a participant’s plan
• read and understood Our Guideline – Specialist Disability Accommodation (external).
Before you start – 5
Page 159 of 173
FOI 24/25-1942
SGP KP Publishing – Check the specialist disability accommodation (SDA) enrolled dwelling details
3 Check if a specialist disability accommodation (SDA)
dwelling is enrolled
1. From the
PACE home screen, open the
App Launcher and select
SDA Enrolment.
2. Check the
Assets list is showing. If not, expand the search options and select
Assets. 3. Type the address in the search field. Use the street name or the suburb to widen your
search. Use Enter on your keyboard rather than selecting the address from the list of
dwellings you have viewed before. If the SDA dwelling does not appear, confirm the
address with the participant or nominee. Otherwise, email s22(1)(a)(ii) - irrelevant material
for advice.
4. Select the
Asset Name for the dwelling from the list.
Note: If two enrolled dwellings have the same or similar address, confirm the correct
address with the participant or nominee. Otherwise, email s22(1)(a)(ii) - irrelevant material
for advice.
Example: Unit 1, 35 Smith Street Geelong and 1/35 Smith Street Geelong or Apartment 1,
35 Smith Road Geelong.
5. Check the dwelling
Status. If the dwelling status is:
o
Enrolled, you can view the enrolled dwelling details
o
Draft, Pending Update or
Pending Approval, the dwelling is not enrolled and
you cannot confirm the enrolled dwelling details.
Email s22(1)(a)(ii) - irrelevant material for a progress update. Wait for further
advice from the SDA Enrolment team before adding SDA supports in
the participant’s plan.
o
Not Enrolled, you cannot confirm the enrolled dwelling details. Don’t include
SDA funding in the participant’s plan. If the participant is assessed for SDA but
is not currently living in an enrolled dwelling, don’t include SDA funding in their
plan. Instead, you wil add supports based on their current home and living
situation. For guidance, go to article Understand interim supports when there
are expected changes to a home and living situation.
Check if a specialist disability accommodation (SDA) dwel ing is enrolled – 6
Page 160 of 173
FOI 24/25-1942
SGP KP Publishing – Check the specialist disability accommodation (SDA) enrolled dwelling details
4 View the enrol ed dwel ing details
You only view the enrolled dwelling details if the
Status is
Enrolled. From the
Details tab:
1. Check the
Account field and make sure it is the correct dwelling and location.
2. Review the
Enrolment Details including the
Building Type and
Design Category.
3. Is the
Design Category listed as a
Multi Design Category?
o If yes, go to step 4.
o If no, make a note of the
Max Price per Resident Yearly amount of the
enrolled dwelling. and go to step 5.
4. In
Multi Design Category Details:
o find the participant’s
Design Category. It wil be either 1 Improved Liveability, 2
Fully Accessible, 3 Robust or 4 High Physical Support
o note the
Max Price Per Resident Yearly based on their
Design Category.
Note: You may not be able to see the
Multi Design Category Details. If this is the
case, email s22(1)(a)(ii) - irrelevant material and request the information.
5. Use the
Enrolment, Multi Design Category Details and the
Max Price per Resident
Yearly amount when developing the participant’s plan.
View the enrolled dwelling details – 7
Page 161 of 173
FOI 24/25-1942
SGP KP Publishing – Check the specialist disability accommodation (SDA) enrolled dwelling details
5 Next steps
1. Record the enrolled dwelling details in the plan meeting notes. For guidance to record
plan meeting notes, go to article Add plan meeting notes.
2. Use the
Enrolment, Multi Design Category Details and the
Max Price per Resident
Yearly amount to support your conversation and develop the participant’s plan.
3. Include SDA supports in the participant’s plan, if relevant. For guidance, go to article
Add Specialist Disability Accommodation (SDA) funding.
Next steps – 8
Page 162 of 173
DOCUMENT 14
FOI 24/25-1942
Understand claim verification
SGP KP Publishing
Exported on 2025-05-12 00:08:21
Page 163 of 173
FOI 24/25-1942
SGP KP Publishing – Understand claim verification
Table of Contents
1 Recent updates . . . . . . . . . . . . . . . . . . . . . . . . . . . . . . . . . . . . . . . . . . . . . . . . . . . . . . . . . . 4
2 Before you start . . . . . . . . . . . . . . . . . . . . . . . . . . . . . . . . . . . . . . . . . . . . . . . . . . . . . . . . . . 5
3 Understand the claim verification process . . . . . . . . . . . . . . . . . . . . . . . . . . . . . . . . . . . . 6
3.1 How participants know they have claims to verify .............................................................. 6
4 Help the user verify claims through the my NDIS participant portal . . . . . . . . . . . . . . . 7
4.1 Help the user dispute a claim ............................................................................................. 7
4.2 Help the user accept claims ............................................................................................... 7
4.2.1
To accept individual claims ........................................................................................................... 7
4.2.2
To accept all claims, or accept the remaining claims not being disputed ...................................... 8
5 Help the user verify claims through the my NDIS app . . . . . . . . . . . . . . . . . . . . . . . . . . 10
5.1 Help the user accept claims ............................................................................................. 10
5.1.1
To accept al claims from the Claims screen ............................................................................... 10
5.1.2
To accept individual claims from the Claims screen ................................................................... 10
5.2 Help the user dispute a claim ........................................................................................... 10
6 Next steps . . . . . . . . . . . . . . . . . . . . . . . . . . . . . . . . . . . . . . . . . . . . . . . . . . . . . . . . . . . . . . 11
Table of Contents – 2
Page 164 of 173
FOI 24/25-1942
SGP KP Publishing – Understand claim verification
This article provides guidance for the National Contact Centre, payments officer, complaints
officer, planner delegate, planner (non-partnered area), participant support officer, business
support officer, local area coordinator, early childhood partner, quality officer or home and living
delegate to:
• understand the claim verification process
• help the user verify claims through the my NDIS participant portal
• help the user verify claims through the my NDIS app.
Recent updates – 3
Page 165 of 173
FOI 24/25-1942
SGP KP Publishing – Understand claim verification
1 Recent updates
31 March 2025
Guidance updated to inform staff that to keep participant information safe, users of the my NDIS
app (the app) wil be prompted to repeat the
Verify it's you step from time to time.
Recent updates – 4
Page 166 of 173
FOI 24/25-1942
SGP KP Publishing – Understand claim verification
2 Before you start
You have confirmed:
• the participant's preferred contact method
• the participant or authorised representative is verifying a claim for Agency-managed
funds. To help the user submit a self-managed claim in the my NDIS app, go to article
Support the participant to submit a self-managed claim.
You have read and understood:
• Making claims (external)
• Provider compliance (external)
• article my NDIS app learning tool
• article Access parallel view of the my NDIS portal.
Before you start – 5
Page 167 of 173
FOI 24/25-1942
SGP KP Publishing – Understand claim verification
3 Understand the claim verification process
The claim verification process is how we record the participant or authorised representative's
decision to accept or dispute claims. Claims are submitted by providers for NDIS supports that
have Agency-managed funding. These providers aren't recorded as my providers.
The user can accept or dispute claims in the my NDIS participant portal (my NDIS portal).
Authorised representatives must hold
Verify a Service permission. This is the permission to
confirm a service, such as supports provided by a provider. Al Agency staff and partners
(except for access officers) can record the decision of the participant or authorised
representative to accept or dispute claims. To learn more, go to article Manage claim
verification.
Accepted claims wil move to a pending payment and we'll pay them in line with business
payment processing.
Disputed claims are placed on hold and are automatically routed to a claim review officer. The
claim remains on hold until a claim review officer investigates and decides to pay or reject the
claim.
The claim review officer wil make sure:
• the claim has valid details
• the participant or their authorised representative has agreed to the support.
To learn about adding a my provider, go to article Add or update a provider relationship.
Providers can make a request for a my provider relationship with participants who have Agency-
managed funds to pay for NDIS supports. Participants can accept or decline these relationship
requests in their my NDIS portal. Learn more in article my NDIS portal – Understand provider
relationships and consent to share information.
3.1 How participants know they have claims to verify
We notify participants via text message (SMS) when they have claims to verify. SMS are sent
once a day at 2pm. If there are multiple claims, we'll send them in a batch SMS. If someone is
authorised representative for more than one participant, they'll receive a separate SMS for each
participant.
Participants and authorised representatives have 6 calendar days from when the provider
submits the claim to accept or dispute it. If the participant or authorised representative doesn't
respond within 6 days, claims waiting for verification wil proceed to automatic payment.
Note: we send an SMS to everybody with the correct permission in PACE to verify claims. For
example, multiple child representatives who all hold
Verify a Service permission will each
receive the SMS. Only one person needs to accept or dispute the claim. For example, if one
parent accepts the claim, the other parent won't see the claim in the
Pending claims list. Once
the claim has been actioned, the participant or their authorised representative have view only
access for their past claims in
Claim history.
Understand the claim verification process – 6
Page 168 of 173
FOI 24/25-1942
SGP KP Publishing – Understand claim verification
4 Help the user verify claims through the my NDIS
participant portal
To help the user view the claim in their my NDIS portal, ask them to Sign in to myGov
(external). Next they'll go to
Linked services and select
National Disability Insurance
Scheme (NDIS).To learn more, go to article my NDIS portal – Register and sign in through a
myGov account.
From the
Home page in the my NDIS portal:
1. Select
Your tasks, then select
You have a provider claim to check.
2. At
Pending claims, you'll see all pending claims. The oldest claim wil be listed first.
If the user disputes any claims on their list, they'll need to submit the dispute before any
remaining claims can be accepted.
4.1 Help the user dispute a claim
1. Select
Dispute on the right of the listed claim.
2. At
Dispute reason, the user can choose to enter a reason.
Note: entering a reason is optional but the claim review officer wil consider any
information included here when deciding to pay the claim or investigate it further.
3. Select
Submit. The claim has been disputed.
Note: the user can dispute a submitted claim to show the level of service wasn't as
expected but the service was provided. Encourage them to talk about their concerns
with the provider. They can also contact the NDIS Quality and Safeguards Commission
(external) to talk about service quality and their rights.
4.2 Help the user accept claims
Participants and authorised representatives can accept individual claims or accept all remaining
claims that aren't being disputed.
4.2.1 To accept individual claims
1. Select
Accept on the right of the listed claim.
2. The
Option to auto-verify <Provider name> screen will display.
3. At
Auto-verify: Would you like to verify this provider as a my provider to al ow
them to claim from your plan without verification, the answer auto-fills as
No. The
user can choose to change the answer to
Yes.
4. Select
Submit.
If
No was selected, the claim is accepted and they'll see a success message.
If
Yes was selected:
5. The
Proposed relationship – my provider screen wil display.
Help the user verify claims through the my NDIS participant portal – 7
Page 169 of 173
FOI 24/25-1942
SGP KP Publishing – Understand claim verification
6. At
Auto-verify: Would you like to verify this provider as a my provider to al ow
them to claim from your plan without verification, the answer auto-fills as
Yes. The
user can change to
No if they don't want to auto-verify future claims from this provider.
7. At
Would you like this relationship to be ongoing? The user must choose
Yes or
No. They can change the auto-fil ed answer to match their choice if required.
Note: selecting
Yes means the provider wil be automatically paid for future claims they
submit. This wil continue until the user or provider ends the relationship. Selecting
No
means the user chooses the period they'l allow the provider to be automatically paid for
claims. The
Start Date wil be today's date. When the user enters an
End Date this
means automatic claim payments to the provider wil end on that date.
8. At
Information in your plan you wil share with this provider, the user can view the
information they're sharing with the provider.
Note: when a my provider relationship is created, the participant's basic details are
automatically shared with the provider. The provider wil see:
o name
o date of birth
o contact details
o communication preferences
o authorised representative (if they have one)
o plan start and reassessment dates.
Basic consent to share is only withdrawn when the participant or provider ends
the my provider relationship. To learn more, go to article my NDIS portal -
Understand provider relationships and consent to share information.
9. At
Plan - goals, select
Yes or
No for consent to share plan goals.
10. At
Do you agree with this request?, select
Submit.
Note: when a participant chooses to auto-verify a provider during the claims process, it
creates a my provider relationship. The my NDIS portal views auto-verification in the
same way as a relationship request.
11. The claim and provider relationship have been accepted. A success message wil
display
Success: You have successfully updated your relationship with
<Provider>. The user wil now see this relationship in their
Active relationships tab.
4.2.2 To accept all claims, or accept the remaining claims not being
disputed
1. Go to
Step 2: Accept and select
Accept remaining claims.
2. An
Accept claims confirmation wil appear. Select
Confirm. The claims are accepted.
Note: if the user chooses to accept all claims, they won't be asked any questions about
auto-accepting future claims or provider relationships during this process.
If the user needs more information, they can select
Claim ID. This will show:
o description
o amount
Help the user verify claims through the my NDIS participant portal – 8
Page 170 of 173
FOI 24/25-1942
SGP KP Publishing – Understand claim verification
o management type
o ABN (Australian Business Number)
o support budget
o support category
o item number
o the NDIS Price Guide
o submitted by (the provider who made the claim).
Note: if the user needs help, they can contact their support coordinator, recovery coach, my
NDIS contact or call the National Contact Centre on 1800 800 110.
Help the user verify claims through the my NDIS participant portal – 9
Page 171 of 173
FOI 24/25-1942
SGP KP Publishing – Understand claim verification
5 Help the user verify claims through the my NDIS app
To help the participant or authorised representative view claims in their my NDIS app, ask the
user to open the app and sign in. Users of the app may be prompted to repeat the
Verify it's
you step from time to time to make sure their information remains safe. To learn more, go to
article my NDIS app – Register, sign in and connect to a myGov account.
5.1 Help the user accept claims
The app user can review a claim from the
Claims,
View pending claims,
View claims history,
Notifications (bell), or
Budget screens.
5.1.1 To accept all claims from the Claims screen
1. Select
Claims.
2. Select
View pending claims. The number showing in brackets is the number of claims
to verify. A message wil display if there are no claims to verify.
3. The list of claims wil open. If there are more than 20 claims to verify, select
Load more
to see the remaining claims.
4. Select
Accept all claims to verify and accept all the listed claims.
5. Select
Confirm. A success message wil display to confirm the claims have been
accepted.
5.1.2 To accept individual claims from the Claims screen
1. Select
Claims.
2. Select
View pending claims. The number showing in brackets is the number of claims
to verify. A message wil display if there are no claims to verify.
3. Select
View on an individual claim to view the claim information.
4. Scroll down and select
Accept. A success message wil display to confirm the claim
has been accepted.
5.2 Help the user dispute a claim
1. Select
Claims.
2. Select
View pending claims. The number showing in brackets is the number of claims
to verify. A message wil display if there are no claims to verify.
3. Select
View on an individual claim to view the claim information.
4. Scroll down and select
Dispute.
5. At
Dispute Reason, the user can choose to enter a reason. Select
Submit. The claim
has been disputed and wil be reviewed.
Note: entering a reason is optional but the claim review officer wil consider any information
included here when deciding to pay the claim or investigate it further.
Help the user verify claims through the my NDIS app – 10
Page 172 of 173
FOI 24/25-1942
SGP KP Publishing – Understand claim verification
6 Next steps
• If the user accepts a claim, it wil move to pending payment immediately and be paid.
• If the user disputes a claim, the claim status wil move to pending review. A claim
review officer wil investigate and decide to pay or reject the claim. The claim review
officer may contact the participant, authorised representative, or provider for more
information about the claim. To learn more about the claim review process, go to article
CP – Resolve a Claim and Payment Verification Case for Claim Review Officer.
• If the claim is not accepted or disputed, it wil move to pending payment after 7 days.
The provider may receive payment outside of 7 days.
• Talk to the participant about providers they use regularly. They may want to add these
providers as a my provider to allow them to be automatically paid. To learn more, go to
article Add or update a provider relationship.
Next steps – 11
Page 173 of 173